前言
本篇还会持续更新,增加更多用 llvm 干的事情,直到本句话被删掉为止。欢迎关注本篇。
目前在做一些编译相关调研。先前写过篇《深入剖析 iOS 编译 Clang / LLVM》和《深入剖析 iOS 编译 Clang / LLVM 直播的 Slides》,内容偏理论。本篇着重对 LLVM 的使用,理论内容会很少,主要是说下如何使用 llvm 来做些事情,会有详细的操作步骤和工程示例。本文对应的幻灯片见 《使用 LLVM 分享的幻灯片》。
代码新陈代谢
昨天看了昨天和今天 WWDC22 的 session,看到了苹果为包体积也做了很多工作,甚至不惜改 C ABI的 call convention 来达到此目的。
我很早前就做过一个方案,可以说是一个更好处理代码新陈代谢的方案,那就先说下这个。
方案总体介绍
静态检查无法分析真实使用场景里代码是不是真的用了,或用的是否多。
动态检查来说,以前检查的方式有通过埋点查看相应代码是否有用到,还可以通过类的 isInitialized 方法来统计类是否被用到。第一个方案成本高,第二个方案范围太大,如果类都很大,那么检查结果的意义就没了。因此,需要一个能够动态检查函数和代码块级别是否使用的方法。
一些现有方案和其不可用的地方
下面列两个已有可检查比类更小粒度的方案。
gcov
clang 使用 -fprofile-instr-generate -fcoverage-mapping ,swiftc 使用 -profile-generate -profile-coverage-mapping 生成 .profraw 文件。llvm-profdata merge 转成 .profdata。编译时每个文件会用 GCOVProfiling 生成 .gcno 包含计数和源码的映射关系,运行时用的是 GCDAProfiling 处理回调记录运行时执行了哪些代码。最后 llvm-cov 转成报告,生成工具是 gcov,生成的报告可以看到哪些代码有用到,哪些没有用。
gcov 对于线下测试够用,但无法放到线上使用。
SanitizerCoverage 插桩回调函数
SanitizerCoverage 是 libfuzzer 使用的代码覆盖技术,使用 -fsanitize-coverage=trace-pc-guard 这个编译 flag 插入不同级别的桩,会在程序控制流图的每条边插入__sanitizer_cov_trace_pc_guard。
如果只对函数插桩,使用 -fsanitize-coverage=func,trace-pc-guard,只对基本块用 -fsanite-coverage=bb,no-prune,trace-pc-guard。swift 使用 -sanitize-coverage=func 和 -sanitize=undefined 编译 flags。
在回调函数 __sanitizer_cov_trace_pc_guard_init 和 __sanitizer_cov_trace_pc_guard 里实现自己要干的事情,比如对当前插桩地址符号化,运行后就可以得到运行时调用了哪些方法。
使用 SanitizerCoverage 插桩,一个是编译会很慢,另一个是插入范围难控制,上线后各方面影响不可控。SanitizerCoverage 本是用于 fuzzing 测试的一个 llvm pass,因此可以了解 SanitizerCoverage 使用的技术,自建一个专门用于代码新陈代谢的 pass 用来解决 SanitizerCoverage 和 gcov 不好用的问题。
自制可插入指令的 Pass
之所以在编译中间层插入指令而不在编译 frontend 插入代码的原因是,这样做的话能用类似 llvm-mctoll 二进制转中间层 IR 代码的方式,可对第三方这样没有 frontend 源码而只有生成的二进制产物的库进行分析。
在函数中插入执行指令执行自定功能的方法是,用 IRBuilder 使用 SetInsertPoint 设置位置,CreateCall 插入指令,插入在块的初始位置,用的是 dyn_cast<BinaryOperator>(&I) 。CreateCall 调用 LLVMContextFunctionCallee 来自 F.getParent()->getOrInsertFunction,其第一个参数就是要执行我们自定义函数的函数名,第二个参数 FunctionType 是通过 paramTypes 和 Type::getVoidTy 根据 LLVMContext 而来。 使用编译属性可以指定要控制的函数,pass 可用 getGlobalVariable 取到 llvm.global.annotations ,也就是所有编译属性。
F.getName().front() 为 \x01 表示的是 OC 方法,去掉这个前缀可得到方法名,.contains("_block") 是闭包函数。F.getName().startswith("_Z") 是 C++ 函数(_Z、__Z、___Z 都是)。使用 F.getName() 判读读取一个映射表进行对比,也可以达到通过编译属性设置控制指定函数的效果。映射表里设置需要线上验证的函数集合。然后,处理函数和块计数与源码的映射关系,编译加入处理自制 pass 记录运行时代码执行情况的回调。
使用
pass 代码编译生成 dylib 后,在 Xcode 中使用需要替换 clang 为编译 pass 的 clang,编译 pass 的版本也要对应上。在 xconfig 中设置构建命令选项 OTHER_CFLAGS OTHER_CPLUSPLUSFLAGS 是 -Xclang -load -Xclang $pass,CC CXX 设置为替换的 clang。调试是用的 opt,可换成 opt scheme,在 Edit Scheme 里设置 opt 的启动参数。
llvm 14 后只能使用 new pm,legcy pm(pass manager) 通过 Xlang 给 clang 传参,而 new pm 不行,new pm 的 pass 让 clang 加载,一种方法是使用 -fpass-plugin,另一种是把 pass 加到 clang 的 pipeline 里,重新构建对应版本的 clang。具体来说就是 PassBuilder 的回调 registerPipelineStartEPCallback 允许 ModulePassManager 使用 addPass 添加我们的 pass。
方案是这样,接下来的内容是偏实际的一些操作,你也可以跟着实践下,毕竟本篇是说怎么使用 LLVM 嘛。
先看看 gcov 的用法。
生成代码覆盖率报告
命令行中开启代码覆盖率的编译选项,参看官方指南:Source-based Code Coverage 。
通过一个例子实践下。
建个 C 代码文件 main.m :
#include <stdio.h>

int main(int argc, char *argv[])
{
    printf("hi there!\n");
    return 0;
}


void foo() {
    return;
}
加上代码覆盖率的编译参数进行编译。
xcrun clang -fprofile-instr-generate -fcoverage-mapping main.m -o mainCoverage运行生成的 mainCoverage 会生成 default.profraw 文件,自定义文件名使用 LLVM_PROFILE_FILE=”my.profraw” ./mainCoverage 命令。
对于 Swift 文件也没有问题,建一个 swift 文件 hi.swift
hi()

func hi() {
    print("hi")
}

func f1() {
    doNothing()
    func doNothing() {}
}
通过 swiftc 来编译
swiftc -profile-generate -profile-coverage-mapping hi.swift从上面 clang 和 swiftc 的命令可以看出,clang 使用的是 -fprofile-instr-generate 和 -fcoverage-mapping 编译 flags,swiftc 使用的是 -profile-generate 和 -profile-coverage-mapping 编译 flags。
编译出的可执行文件 mainCoverage 和 hi 都会多出
生成代码覆盖率前建立索引,也就是生成 .profdata 文件。通过 xcrun 调用 llvm-prodata 命令。命令如下:
xcrun llvm-profdata merge -sparse my.profraw -o my.profdata合并多个 .profdata 文件使用下面的命令:
llvm-profdata merge one.profdata two.profdata -output all.profdata使用 llvm-cov 命令生成行的报告
xcrun llvm-cov show ./mainCoverage -instr-profile=my.profdata输出:
 1|       |#include <stdio.h>
 2|       |
 3|       |int main(int argc, char *argv[])
 4|      1|{
 5|      1|    printf("hi there!\n");
 6|      1|    return 0;
 7|      1|}
 8|       |
 9|      0|void foo() {
10|      0|  return;
11|      0|}
上面的输出可以看到,9到11行是没有执行的。
从文件层面看覆盖率,可以通过下面的命令:
xcrun llvm-cov report ./mainCoverage -instr-profile=my.profdata输出的报告如下:
Filename                                  Regions    Missed Regions     Cover   Functions  Missed Functions  Executed       Lines      Missed Lines     Cover    Branches   Missed Branches     Cover
-----------------------------------------------------------------------------------------------------------------------------------------------------------------------------------------------------------------------------------------------
/Users/mingdai/Downloads/PTest/main.m           2                 1    50.00%           2                 1    50.00%           7                 3    57.14%           0                 0         -
-----------------------------------------------------------------------------------------------------------------------------------------------------------------------------------------------------------------------------------------------
TOTAL                                           2                 1    50.00%           2                 1    50.00%           7                 3    57.14%           0                 0         -
生成 JSON 的命令如下:
xcrun llvm-cov export -format=text ./mainCoverage -instr-profile=my.profdata > my.json从生成的 json 文件可以看到这个生成的报告有5个统计项,分别是函数、实例化、行、区域和分支。
更多报告生成选型参看 llvm-cov 官方说明 。
Xcode 配置生成代码覆盖率报告
在 Xcode 里开启代码覆盖率,先选择”Edit Scheme…”,再在 Test 中的 Options 里勾上 Gather coverage for all targets 或 some targets。如下图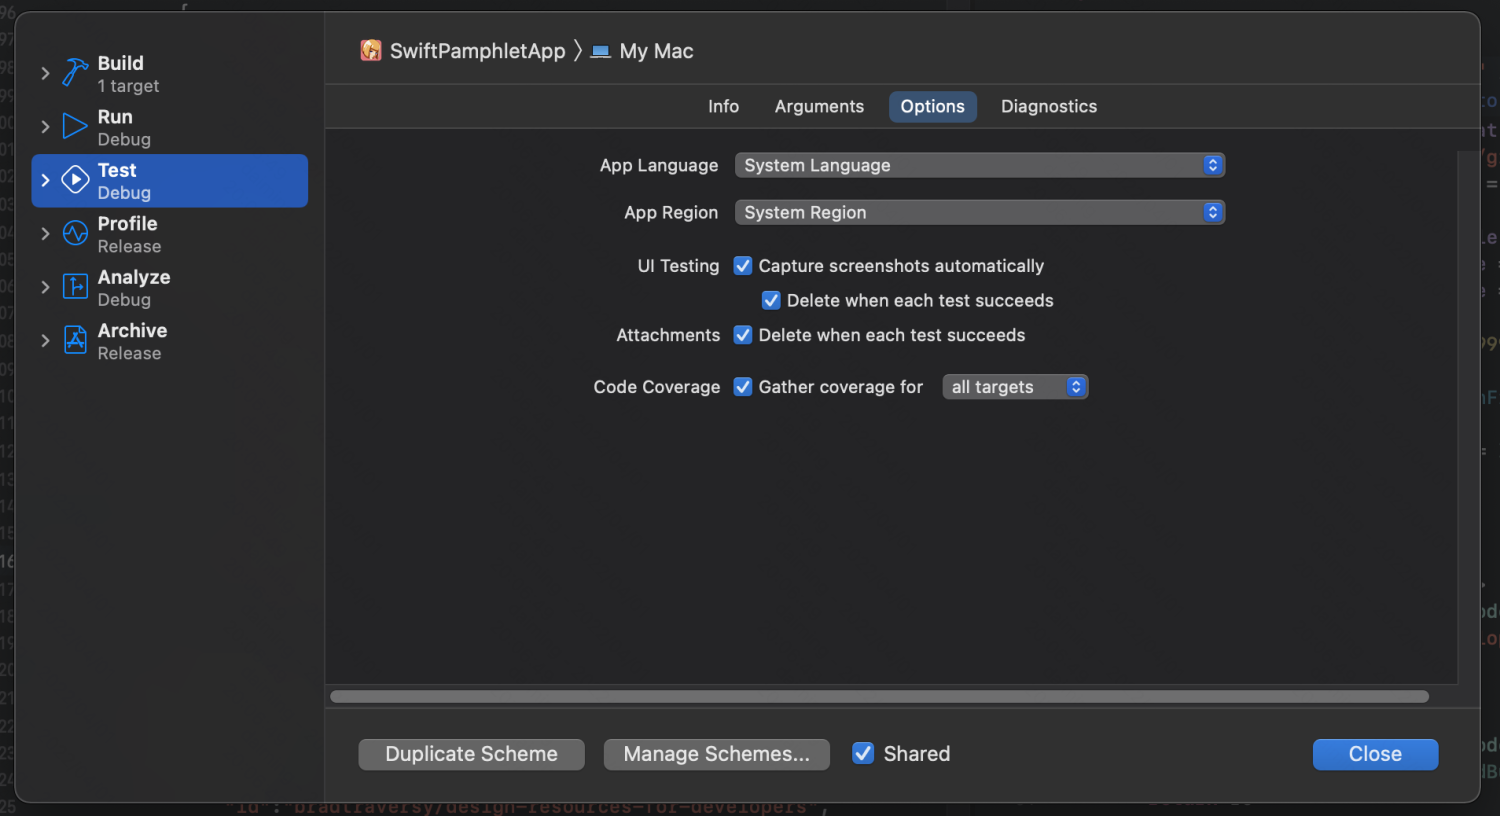
在 Build Setting 中进行设置,添加 -profile-generate 和 -profile-coverage-mapping 编译 flags。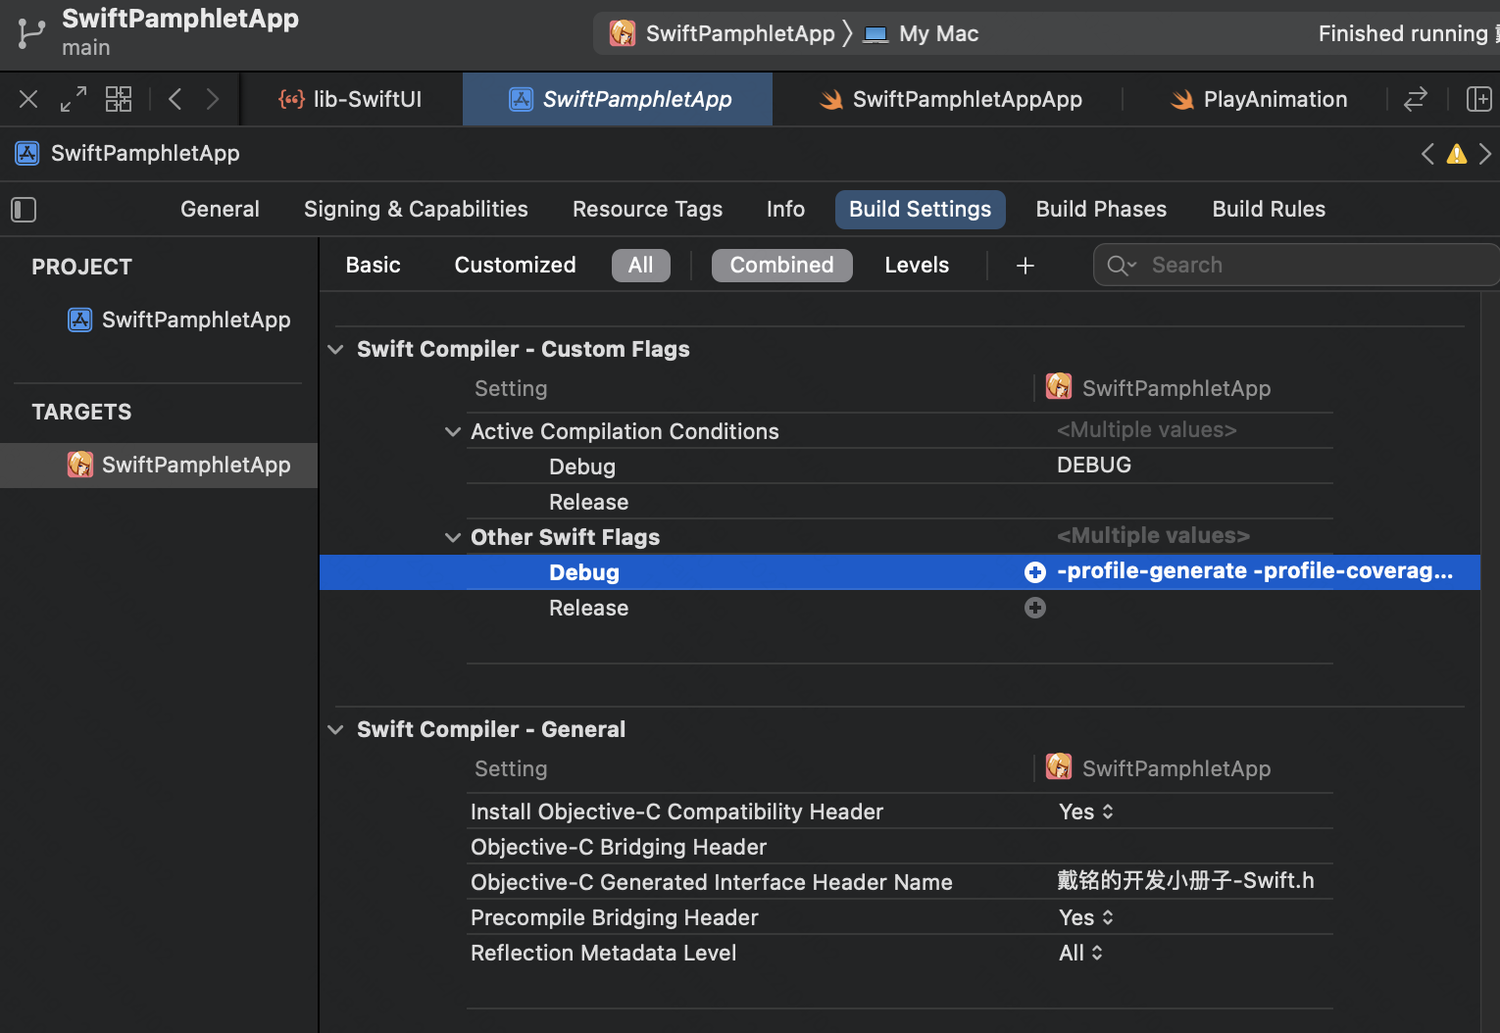
调用 llvm profile 的 c 函数生成 .profraw 文件。代码见:
// MARK: - 代码覆盖率
func codeCoverageProfrawDump(fileName: String = "cc") {
    let name = "\(fileName).profraw"
    let fileManager = FileManager.default
    do {
        let documentDirectory = try fileManager.url(for: .documentDirectory, in: .userDomainMask, appropriateFor:nil, create:false)
        let filePath: NSString = documentDirectory.appendingPathComponent(name).path as NSString
        __llvm_profile_set_filename(filePath.utf8String)
        print("File at: \(String(cString: __llvm_profile_get_filename()))")
        __llvm_profile_write_file()
    } catch {
        print(error)
    }
}
codeCoverageProfrawDump 函数放到 applicationWillTerminate 里执行,就可以生成在本次操作完后的代码覆盖率。
通过 llvm-cov report 命令将 .profraw 和生成的 Mach-O 文件关联输出代码覆盖率的报告,完整实现和调试看,参看 DaiMingCreationToolbox 里的 FundationFunction.swift 和 SwiftPamphletAppApp.swift 文件。
Fuzzing 介绍
另外,llvm 还提供另一种覆盖率输出,编译参数是 -fprofile-arcs -ftest-coverage 和链接参数 -lgcov,运行程序后会生成 .gcda 和 .gcno 文件,使用 lcov 或 gcovr 就可以生成一个 html 来查看覆盖率。
之所以能够输出代码覆盖率,主要是 llvm 在编译期间给函数、基本块(IDA 中以指令跳转当分界线的每块代码)和边界(较基本块多了执行边界信息)插了桩。插桩的函数也有回调,如果想使用插桩函数的回调,有源码可以使用 SanitizerCoverage, 官方说明见:SanitizerCoverage。
SanitizerCoverage 用的是 ModulePass,是 llvm 提供的 ModulePass、CallGraphSCCPass、FunctionPass、LoopPass、RegionPass 这几个插桩 pass 中的一种。SanitizerCoverage 还应用在 llvm 的 Fuzz 生成器 libfuzzer 上,libfuzzer 可以从硬件和 IR 层面进行插桩获取程序的覆盖率。
Fuzzing 生成器的概念最早是威斯康星大学 Barton Miller 教授在他的课上提出的,后应用于安全测试领域,比如 PROTOS 测试集项目、网络协议安全测试 SPIKE、最普遍应用的文件 Fuzzing 技术 Peach、语法模板 funfuzz 和 Dom fuzz 的 Domato、分析 llvm IR 符号执行平台 Klee、源码插桩和 QEMU 模式实现代码覆盖 fuzzing 的 AFL 和刚才我提到的 llvm 自带基于 SanitizerCoverage 的 libfuzzer、挖掘系统内核漏洞的系统函数调用模板 Fuzzing 库 syzkaller 和基于 libfuzzer 和 protobuf 做的 libprotobuf-mutator、组合了 libFuzzer,AFL++ 和 Honggfuzz 还有 ClusterFuzz 的平台 OSS-Fuzz。
其中 Spike 是网络协议开源 Fuzzing 工具,由 Dave Aitel 编写的,Dave Aitel 是《the Hacker’s Handbook》(《黑客防范手册》)和《the Shellcoder’s Handbook》(《黑客攻防技术宝典:系统实战篇》)的作者。网络协议分析工具主要是 WireShark 和应用层的 SockMon(特定进程、协议、IP、函数抓包),和 IDA、OD 等工具结合找到软件执行的网络命令分析数据包的处理过程。Spike 可以对数据发包收包,还可以构造数据包自动化做覆盖更大的测试。
QEMU 是 2003 年 Fabrice Bellard 做的虚拟机,包含很多架构和硬件设备的模拟执行,原理是 qemu TCG 模块把机器代码转成 llvm IR,这个过程叫做反编译,关于反编译可以参考这篇论文《An In-Depth Analysis of Disassembly on Full-Scale x86/x64 Binaries》。之所以可以做到反编译是因为机器指令和汇编指令是一一对应的,可以先将机器指令翻译成机器对应的汇编,IR 实际上就是一个不遵循硬件设计的指令集,和硬件相关的汇编会按照 IR 的设计翻译成机器无关的 IR 指令。这样做的好处就是无论是哪个机器上的可执行二进制文件都能够统一成一份标准的指令表示。IR 也可以设计成 DSL,比如 Ghidra 的 Sleigh 语言。
反编译后,再将得到的 IR 转成目标硬件设备可执行机器语言,IDA Pro 也是用的这个原理,IDA 的 IR 叫 microcode,IDA 的插件 genmc 专门用来显示 microcode,HexRaysDeob 是利用 microcode 来做混淆的库。
qemu 做的是没有源码的二进制程序的分析,是一个完整的虚拟机工具,其中只有 tcg 模块的一部分功能就可以实现模拟 CPU 执行,执行过程中插入分析的代码就能够方便的访问寄存器,对地址或指令 hook,实现这些功能的库是 Unicorn,还有功能更多些的 Qiling。Qiling 和 Unicorn 不同的是 Unicorn 只完成了 CPU 指令的仿真,而 Qiling 可以处理更高层次的动态库、系统调用、I/O 处理或 Mach-O 加载等,Qiling 还可以通过 Python 开发自己动态分析工具,运行时进行 hotpatch,支持 macOS。基于 qemu 还有可以访问执行的所有代码和数据做回放程序执行过程的 PANDA、虚拟地址消毒剂 QASan、组合 Klee 和 qemu 的 S2E。
能够使用 js 来开发免编译功能的 Frida 也可以用于 Fuzzing,在 iOS 平台上的 Fuzzing 参看1、2、3,使用工具见 iOS-messaging-tools。
更多 Fuzzing 资料可以参看 GitHub 上一份整理好的 Awesome-Fuzzing。
可见 Fuzzing 生成器应用范围非常广,除了获取代码覆盖率,还能够进行网络安全分析和安全漏洞分析。本文主要是基于源码插桩,源码插桩库主要是 libfuzzer、AFL++、honggfuzz、riufuzz(honggfuzz 二次开发)。
AFL++ 在有源码情况下原理和 libfuzzer 差不多,只是底层不是用的 SanitizerCoverage,而是自实现的一个 pass,没有源码时 AFL++ 用的就是 qemu 中 TCG 模块的代码,在反编译为 IR 时进行插桩。更多 AFL++ 应用参见《What is AFL and What is it Good for?》
Fuzzing 除了代码覆盖率,还需要又能够创建更多输出条件,记录执行路径,目标和方向是找出程序运行时在什么输入条件和路径下会有问题。但仅是检测哪些代码有用到,实际上只要用上 Fuzzing 的代码覆盖率就可以了。
SanitizerCoverage 插桩回调函数
那接下来实践下 libfuzzer 中实现代码覆盖率的 SanitizerCoverage 技术。
命令行执行
xcrun clang -fembed-bitcode main.m -save-temps -v -fsanitize-coverage=trace-pc-guard使用 -fsanitize-coverage=trace-pc-guard 这个编译 flag 插入不同级别的桩,会在程序控制流图的每条边插入:
__sanitizer_cov_trace_pc_guard(&guard_variable)如果只对函数插桩,使用 -fsanitize-coverage=func,trace-pc-guard,只对基本块用 -fsanite-coverage=bb,no-prune,trace-pc-guard。swift 使用 -sanitize-coverage=func 和 -sanitize=undefined 编译 flags。
使用插桩函数回调,先在 Xcode 的 Other C Flags 里添加 -fsanitize-coverage=trace-pc-guard。swift 就是在 Other Swift Flags 里添加 -sanitize-coverage=func 和 -sanitize=undefined 。
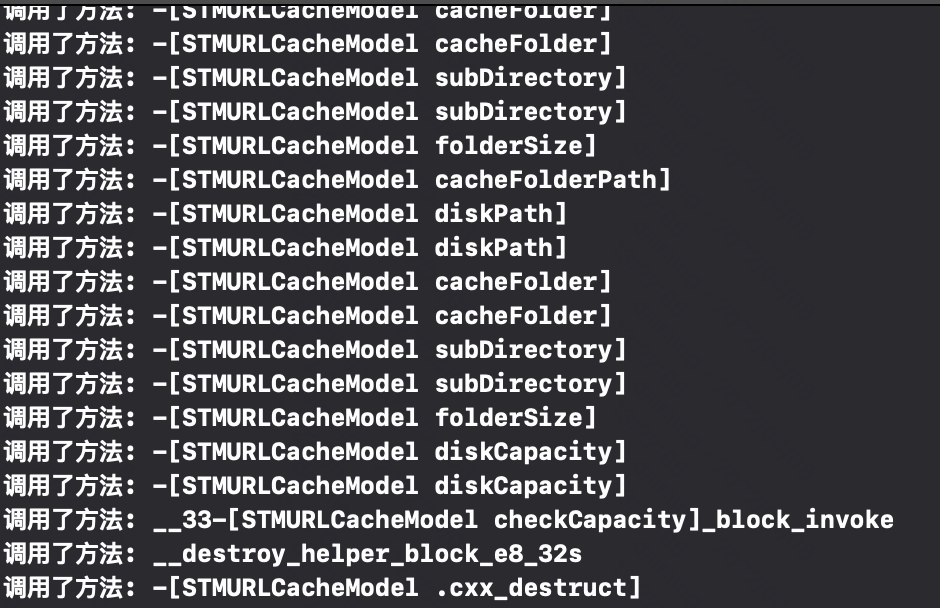
在回调函数里实现自己要干的事情,比如对当前插桩地址符号化,代码如下:
#import <dlfcn.h>

void __sanitizer_cov_trace_pc_guard_init(uint32_t *start,
           uint32_t *stop) {
    static uint64_t N;
    if (start == stop || *start) return;
    printf("INIT: %p %p\n", start, stop);
    for (uint32_t *x = start; x < stop; x++)
  ,*x = ++N;
}

void __sanitizer_cov_trace_pc_guard(uint32_t *guard) {
    if (!*guard) return;
    void *PC = __builtin_return_address(0);
    Dl_info info;
    dladdr(PC, &info);
    printf("调用了方法: %s \n", info.dli_sname);
}
运行后就可以得到运行时调用了哪些方法。
有了这些数据就可以统计哪些方法调用了,调用了多少次。通过和全源码对比,取差集能够找到运行中没有执行的方法和代码块。其实利用 Fuzzing 的概念还可以做很多分析的工作,全面数据化观测代码执行情况。可以到我的 GCDFetchFeed 工程中,打开 AppDelegate.m 里的两个插桩回调方法的注释来试用。
停止试用插桩,可以用 __attribute__((no_sanitize("coverage"))) 编译属性。或者通过黑名单或白名单,分别是 -fsanitize-coverage-ignorelist=blocklist.txt 和 -fsanitize-coverage-allowlist=allowlist.txt,范围可以试文件夹、单个文件或者单个方法。
allowlist.txt 示例:
# 允许文件夹里所有文件
src:bar/*
# 特定源文件
src:foo/a.cpp
# 允许文件中所有函数
fun:*
blocklist.txt 示例:
# 禁用特定源文件
src:bar/b.cpp
# 禁用特定函数
fun:*myFunc*
上线前检查出的没有用到的代码,并不表示上线后用户不会用到,比如 AB 实验、用户特殊设置、不常见 Case 等。这就可以利用 allowlist.txt 将部分不确定的代码放到线上去检测,或者通过自动插入埋点灰度检测,这些不确定的代码不是主链路的,因此检测影响范围会很低。
SanitizerCoverage 本身是一个 llvm pass,代码在 llvm 工程的 llvm-project/llvm/lib/Transforms/Instrumentation/SanitizerCoverage.cpp 路径下,那么怎么实现一个自定义的 pass 呢?
先把 llvm 装到本地。
安装 LLVM
手动
使用 homebrew,命令如下:
brew install llvm@13@13 表示 llvm 的版本。安装后使用路径在是 /usr/local/opt/llvm/,比如 cmake 构建编译环境可以使用下面的命令:
$LLVM_DIR=/usr/local/opt/llvm/lib/cmake/llvm cmake ..可以用 Visual Studio Code 开发 pass,安装微软的 C/C++ 的 extension,在 C/C++ Configurations 里把 /usr/local/opt/llvm/include/ 加入到包含路径中。
llvm 的更新使用 brew upgrade llvm
llvm 也可以通过源码来安装,执行如下命令即可:
git clone https://github.com/llvm/llvm-project.git
cd llvm-project
git checkout release/14.x
mkdir build
cd build
cmake -DCMAKE_BUILD_TYPE=Release -DLLVM_TARGETS_TO_BUILD=host -DLLVM_ENABLE_PROJECTS=clang ../llvm
cmake --build .
这里的 cmake 参数 -DLLVM_ENABLE_PROJECTS=clang 表示也会构建 clang 工具。如果还要加上 lld 以在构建时能够用自己的 pass,可以直接加成 -DLLVM_ENABLE_PROJECTS="clang;lld" 。
自定义安装目录的话,增加 -DCMAKE_INSTALL_PREFIX=/home/user/custom-llvm 。然后在设置路径 export PATH=$PATH:/home/user/custom-llvm/bin 。
-G 编译选项选择 Ninja 编译速度快。
各种设置整到一起:
cmake -G "Ninja" -DCMAKE_BUILD_TYPE=Release -DLLVM_TARGETS_TO_BUILD=host -DLLVM_ENABLE_PROJECTS="clang;lld" -DCMAKE_INSTALL_PREFIX=/Users/mingdai/Downloads/PTest/my-llvm-bin ../llvm自制 Pass
Pass 介绍
llvm 属于 multi-pass 编译器,LLVM Pass 管理器是处理 pass 执行的注册和时序安排。曾有两个 pass 管理器,一个是 New Pass 管理器也叫 Pass 管理器,另一个是 Legacy Pass 管理器。New Pass 目前是默认的管理器,Legacy Pass 在 LLVM 14 中被废弃。Legacy 和 New 两个 pass 管理器在使用上最大的区别就是,Legacy 会注册一个新的命令选项,而 New Pass 只用定义一个 pass。另外 Legacy 需要实现 print 成员方法来打印,需要在通过 opt 通过传递 -analyze 命令行选项来运行,而 New Pass 管理器是不用的,只需要实现 printing pass。
总的来说
Legacy
- 基于继承性
- 分析和打印 pass 之间没有区别
- 注册时加载所有需要的 pass
- 不变的 pass 执行调度
- Transformation passes 定义了它们在执行前保证保留的内容
Legacy 的 pass 类
llvm::Passllvm::ModulePassllvm::FunctionPassllvm::PassRegistry
New
- 基于 CRTP、mixin 和 concept-model 的 idiom-based
- 在执行过程中,根据需要有条件的加载依赖的 pass(更快、更有效)
- Transformation passes 在执行后返回它们所保留的内容
New 的 pass 类
llvm::PassInfoMixin<DerivedT>llvm::AnalysisInfoMixin<DerivedT>llvm::FunctionAnalysisManager- 别名类型
llvm::AnalysisManager<llvm::Function>
- 别名类型
llvm::ModuleAnalysisManager- 别名类型
llvm::AnalysisManager<llvm::Module>
- 别名类型
llvm::PreservedAnalysis
LLVM Pass 可以对 LLVM IR 进行优化。优化表现在 Pass 可以对 IR 进行分析和转换,因此 Pass 主要也是分为分析(analysis)和转换(transform)两类。
分析里有数据流分析技术,分为以下三种:
- Reaching-Definition Analysis 到达定值分析
- Live-Variable Analysis 活跃变量分析
- Available-Expression Analysis 可用表达式分析
一些常用的优化方法,比如删除计算结果不会使用的语句、删除归纳变量、删除公共子表达式、进入循环前就对不管循环多少次都是同样结果的表达式进行求值、快的操作替换慢操作、用可推导出值是常量的表达式来替代表达式等。
编写优化的几个方法。完整代码参看这里。
插入新指令:
- 直接通过类或命名的构造函数。
- 使用 llvm::IRBuilder<> 模板类。
删除指令:
- llvm::Instruction::eraseFromParent() 成员函数
替换存在指令:
- llvm::ReplaceInstWithInst() 函数
#include "llvm/Transforms/Utils/BasicBlockUtils.h"
直接改指令
- llvm::User::setOperand() 成员函数
Value ⇒ ConstantInt 类型转换:
Type _t;
ConstantInt* val = dyn_cast<ConstantInt>(_t);
获取 ConstantInt 类的值
ConstantInt* const_int;
uint64_t val = const_int->getZExtValue();
替换某个指令
Instruction inst;
// 替换,只是替换了引用,并没删
inst.replaceAllUsesWith(val);

// 删除
if(inst->isSafeToRemove())
    inst->eraseFromParent();
对应的 IR 代码
; 执行前
%12 = load i32, i32* %2, align 4
%13 = add nsw i32 %12, 0
store i32 %13, i32* %3, align 4
; 只替换指令引用
%12 = load i32, i32* %2, align 4
%13 = add nsw i32 %12, 0
store i32 %12, i32* %3, align 4
%12 = load i32, i32* %2, align 4
store i32 %12, i32* %3, align 4
Instruction referencing instruction not embedded in a basic block!
  %12 = load i32, i32* %2, align 4
  <badref> = add nsw i32 %12, 0
建立新指令
// 取出第一个操作数
Value* val = inst.getOperand(0);
// 确定新指令的插入位置
IRBuilder<> builder(&inst);
// val << 1
Value* newInst = builder.CreateShl(val, 1);
// 替换指令
inst.replaceAllUsesWith(newInst);
Analysis pass 的 print pass 是基于一个 Transformation pass,会请求原始 pass 分析的结果,并打印这些结果。会注册一个命令行选项 print<analysis-pass-name>。
实现 pass 要选择是 Analysis 还是 Transformation,也就是要对进行输入 IR 的分析还是进行转换来决定采用哪种。选择 Transformation 通常继承 PassInfoMixin。Analysis 继承 AnalysisInfoMixin。
pass 生成的插件分为动态和静态的。静态插件不需要在运行时用 -load-pass-plugin 选项进行加载,但需要在 llvm 工程中设置 CMake 重新构建 opt。
做自己 pass 前可以先了解下 llvm 内部的 pass 示例,可以先从两个最基本的 Hello 和 Bye 来。比较实用的是一些做优化的 pass,这些 pass 也是学习写 pass ,了解编译器如何工作的重要资源。许多 pass 都实现了编译器开发理论中著名的概念。比如优化 memcpy 调用(比如用 memset 替换)的 memcpyopt 、简化 CFG IRTransforms、总是内联用 alwaysinline 修饰的函数的 always-inline 、死代码消除的 dce 和删除未使用的循环的 loop-deletion。
Xcode 开发模式
在下好的 LLVM 源码中找到 llvm/lib/Transforms 目录,创建一个 MingPass 目录,在这个目录下创建 MingPass.cpp 和 MingPass.exports ,还有 cmake 文件 CMakeLists.txt ,CMakeLists.txt 内容写成:
if( NOT LLVM_REQUIRES_RTTI )
if( NOT LLVM_REQUIRES_EH )
  set(LLVM_EXPORTED_SYMBOL_FILE ${CMAKE_CURRENT_SOURCE_DIR}/MingPass.exports)
endif()
endif()

if(WIN32 OR CYGWIN)
set(LLVM_LINK_COMPONENTS Core Support)
endif()

set(LLVM_LINK_COMPONENTS Demangle)

add_llvm_library( LLVMMingPass MODULE BUILDTREE_ONLY
MingPass.cpp

DEPENDS
intrinsics_gen
PLUGIN_TOOL
opt
)
在 llvm/lib/Transforms/CMakelists.txt 里加上 add_subdirectory(MingPass) 。MingPass.cpp 里编写实际的 pass 代码。
使用 cmake -G "Xcode" 构建 LLVM 工程,打开 LLVM.xcodeproj ,选择 MingPass 这个 target,使用 command+b 进行编译,会生成 MingPass.dylib 产物。
下载和 Xcode 对应 clang 版本。在工程中创建 Config.xcconfig 文件,内容如下:
LLVM_DIR = $HOME/Downloads/PTest/LLVMSource
PASS_DYLIB = $(LLVM_DIR)/build_dir/build_xcode/Debug/lib/LLVMMingPass.dylib
OTHER_CFLAGS = $(inherited) -Xclang -load -Xclang $(PASS_DYLIB)
OTHER_CPLUSPLUSFLAGS = $(inherited) -Xclang -load -Xclang $(PASS_DYLIB)
COMPILER_INDEX_STORE_ENABLE = NO
CC = $(LLVM_DIR)/clang-13.0.0/bin/clang
CXX = $(LLVM_DIR)/clang-13.0.0/bin/clang++
自制插入指令 pass
接下来,怎么在运行时插入指令来获取我们需要代码使用情况。完整代码可以在这里 MingPass 拉下代码参考进行修改调试。
个 pass 功能是在运行时环境直接在特定位置执行指定的函数。先写个要执行的函数,新建个文件 loglib.m,代码如下:
#include <stdio.h>

void runtimeLog(int i) {
  printf("计算结果: %i\n", i);
}
再到 MingPass.cpp 中包含模块头文件
#include "llvm/IR/Module.h"会用到 Module::getOrInsertFunction 函数来给 loglib.m 的 runtimeLog 做声明。
更改 runOnFunction 函数,代码如下:
virtual bool runOnFunction(Function &F) {
    // 从运行时库中获取函数
    LLVMContext &Context = F.getContext();
    std::vector<Type*> paramTypes = {Type::getInt32Ty(Context)};
    Type *retType = Type::getVoidTy(Context);
    FunctionType *funcType = FunctionType::get(retType, paramTypes, false);
    FunctionCallee logFunc = F.getParent()->getOrInsertFunction("runtimeLog", funcType);

    for (auto &BB : F) {
  for (auto &I : BB) {
      if (auto *op = dyn_cast<BinaryOperator>(&I)) {
    IRBuilder<> builder(op);

    // 在 op 后面加入新指令
    builder.SetInsertPoint(&BB, ++builder.GetInsertPoint());
    // 在函数中插入新指令
    Value* args[] = {op};
    builder.CreateCall(logFunc, args);

    return true;
      } // end if
  }
    }
    return false;
}
在 build 目录下 make 出 pass 的 so 后,链接 main.m 和 loglib.m 的产物成可执行文件,命令如下:
clang -c loglib.m
/usr/local/opt/llvm/bin/clang -flegacy-pass-manager -Xclang -load -Xclang build/src/libMingPass.so -c main.m
clang main.o loglib.o
./a.out
输入数字4后,打印如下:
4
计算结果: 6
6
更多自制 pass
可以在这里查看,代码里有详细注释。这里先留个白,后面再添加内容。
IR
你会发现开发 pass 需要更多的了解 IR,才可以更好的控制 LLVM 前端处理的高级语言。接下来我会说下那些高级语言的特性是怎么在 IR 里表现的。先介绍下 IR。
IR 介绍
LLVM IR(Intermediate Representation) 可以称为中间代码,是 LLVM 整个编译过程的中间表示。
llvm ir 的基础块里的指令是不可跳转到基础块的中间或尾部,只能从基础块的第一个指令进入基础块。
下面是 ir 的几个特点:
- llvm ir 不是机器代码而是生成机器代码之前的一种有些看起来像高级语言的,比如函数和强类型,有些看起来像低级程序集,比如分支和基本块。
- llvm ir 是强类型。
- llvm 没有 sign 和 unsign 整数区别。
- 全局符号用 @ 符号开头。
- 本地符号用 % 符号开头。
- 必须定义和声明所有符号。
IR 指令
常用指令
- alloca:分配栈空间
- load:从栈和全局内存读值
- store:将值写到栈或全局内存
- br:分支(条件或非条件)
- call:调用函数
- ret:从一个函数返回,可能会带上一个返回值
- icmp/fcmp:比较整型或浮点值
- add/sub/mul:整数二进制算术运算
- fadd/fsub/fmul:浮点二进制算术运算
- sdiv/udiv/fdiv:有符号位整数/无符号位整数/浮点除法
- shl/shr:位向左/向右
- lshr/ashr:逻辑/算术右移
- and/or/xor:位逻辑运算(没有
not!)
常用特殊 ir 指令
- select:根据一个没有 IR 级别分支的条件选择一个值。
- phi:根据当前基本块前身选择一个值。
- getelementpointer:获取数组或结构体里子元素的地址(不是值)。官方说明[[https://llvm.org/docs/GetElementPtr.html][The Often Misunderstood GEP Instruction]]。
- extractvalue:从一个数组或结构体中提取一个成员字段的值(不是地址)。
- insertvalue:将一个值添加给数组或结构体的成员字段。
ir 转换指令
- bitcast:将一个值转成给定类型而不改变它的位。
- trunc/fptrunc:将一个类型的整数/浮点值截断为一个更小的整数/浮点类型。
- zext/sext/fpext:将一个值扩展到一个更大的整数/浮点类型上。
- fptoui/fptosi:将一个浮点值转换为无符号/有符号位的整数类型。
- uitofp/sitofp:将一个无符号/有符号位整数值转换为浮点类型。
- ptrtoint:将指针转成整数。
- inttoptr:将整数值转成指针类型。
ir 库的 header 地址在 include/llvm/IR ,源文件在 lib/IR ,文档 llvm Namespace Reference。所有类和函数都在 llvm 命名空间里。
主要基础类的说明如下:
- llvm::Module:ir 的容器类的最高级。
- llvm::Value:所有可作为其他值或指令操作数的基类。
- llvm::Constant
- llvm::ConstantDataArray (Constants.h)
- llvm::ConstantInt (Constants.h)
- llvm::ConstantFP (Constants.h)
- llvm::ConstantStruct (Constants.h)
- llvm::ConstantPointerNull (Constants.h)
- llvm::Function
- llvm::GlobalVariable
- llvm::BasicBlock
- llvm::Instruction
- Useful X-macro header: Instruction.def
- llvm::BinaryOperator (InstrTypes.h)
- add, sub, mul, sdiv, udiv, srem, urem
- fadd, fsub, fmul, fdiv, frem
- shl, lshr, ashr, and, or, xor
- llvm::CmpInst (InstrTypes.h)
- llvm::ICmpInst (Instructions.h)
- llvm::FCmpInst (Instructions.h)
- llvm::UnaryInstruction (InstrTypes.h)
- llvm::CastInst (Instrtypes.h)
- llvm::BitCastInst (Instructions.h)
- llvm::Constant
- llvm::Type:代表所有的 IR 数据类型,包括原始类型,结构类型和函数类型。
全局变量
下面 c 代码:
int variable = 21;

int main()
{
    variable = variable * 2;
    return variable;
}
对应的 ir 代码如下:
@variable = global i32 21

define i32 @main() {
    %1 = load i32, i32* @variable  ; load the global variable
    %2 = mul i32 %1, 2
    store i32 %2, i32* @variable   ; store instruction to write to global variable
    ret i32 %2
}
如上代码,你可以看到全局变量是 @ 字符前缀,main 函数也是 @ 符号作为前缀,因此 main 函数也是 llvm 中的全局变量。llvm 将全局变量看成指针,因此访问全局变量时,必须用 load 指令显示取消对全局变量的引用,同样的,你要用 store 指令显示存储全局变量的值。
本地变量
本地变量有两种,一种是临时变量,也可以说是寄存器,另一种是堆栈分配的局部变量。
临时变量或寄存器是通过为变量引入一个新的符号来创建的:
%reg = add i32 4, 2堆栈分配的局部变量是通过在堆上分配变量来创建的。
%stack = alloca i32几乎每条指令都会返回一个值,该值通常分配给一个临时变量。由于 llvm ir 的 SSA 形式,临时变量只能分配一次。因此下面的代码就会出错:
%tmp = add i32 4, 2
%tmp = add i32 4, 1  ; Error here
为符合 SSA,一般会是下面的代码:
%tmp.0 = add i32 4, 2
%tmp.1 = add i32 4, 1  ; fine now
简化为:
%0 = add i32 4, 2
%1 = add i32 4, 1
这种局部变量的数量基本是无限的。因为真实机器的寄存器数量有限,因此编译器后端可能需要将其中一些临时寄存器放在堆栈上。
alloca 产生一个指向已分配类型的指针。必须要显示的使用 load 或 store 指令来分别读取和写入值。
常量
有两种常量,一种是不占用分配内存的常量,另一种是占用分配内存的常量。
不占用分配内存的常量没有等效 llvm ir,他们是在编译前端将常量值插入到使用他们的位置。
%1 = add i32 %0, 17 ; 17 就是内联的常量占用分配内存的常量使用 constant 关键字定义:
@hello = internal constant [6 x i8] c"hello\00"
%struct = type { i32, i8 }
@struct_constant = internal constant %struct { i32 16, i8 4 }
可以看出常量实际也是个全局变量,可见性可以用 private 和 internal 来限制,这样它在当前模式之外是不可见的。
字符串
在 LLVM 中有两种实现字符串类型的方法:
- 在 LLVM IR 中编写实现
- 用生成 IR 的高级语言编写实现
LLVM IR 中有一个简单但有用的字符串类型。
我们将创建一个动态的、可变的字符串类型,它可以被添加,也可以插入,转换大小写等等,这取决于定义了哪些支持函数来操作字符串类型。
这一切都归结为为类制作合适的类型定义,然后定义一组丰富的函数来对类型定义进行操作
    store i8* %output, i8** %1

    ;this->maxlen = %value (value that was passed into @malloc is the new maxlen)
    %4 = getelementptr %String* this, i32 0, i32 2
    store i32 %value, i32* %4
    ret void
}

define fastcc void @String_Add_Char(%String* %this, i8 %value) {
    ; Check if we need to grow the string.
    %1 = getelementptr %String* %this, i32 0, i32 1
    %length = load i32* %1
    %2 = getelementptr %String* %this, i32 0, i32 2
    %maxlen = load i32* %2
    ; if length == maxlen:
    %3 = icmp eq i32 %length, %maxlen
    br i1 %3, label %grow_begin, label %grow_close

grow_begin:
    %4 = getelementptr %String* %this, i32 0, i32 3
    %factor = load i32* %4
    %5 = add i32 %maxlen, %factor
    call void @String_Resize(%String* %this, i32 %5)
    br label %grow_close

grow_close:
    %6 = getelementptr %String* %this, i32 0, i32 0
    %buffer = load i8** %6
    %7 = getelementptr i8* %buffer, i32 %length
    store i8 %value, i8* %7
    %8 = add i32 %length, 1
    store i32 %8, i32* %1

    ret void
}
结构体
下面的 c 代码:
struct Foo
{
  size_t x;
  double y;
};
对应的 ir 代码如下:
%Foo = type {
    i64,       ; index 0 = x
    double     ; index 1 = y
}
可以看到 struct 的结构成员是从0开始的数字进行索引。
下面是嵌套结构的例子:
struct FooBar
{
    Foo x;
    char* c;
    Foo* y;
}
对应的 ir 代码:
%FooBar = type {
    %Foo,         ; index 0 = x
    i8*,          ; index 1 = c
    %Foo*         ; index 2 = y
}
不完整结构类型,对于隐藏结构细节非常有用。比如下面的 c 代码:
void Bar(struct Foo *);对应的 ir 代码:
%Foo = type opaque
declare void @Bar(%Foo)
ir 的结构成员是通过索引而不是名称来记录的,getelementptr(GEP) 是专门用来计算指向任何结构成员的指针。比如下面 c++ 代码:
struct Foo
{
    int a;
    char *b;
    double c;
};
对应 ir 是:
%Foo = type {
    i32,        ; 0: a
    i8*,        ; 1: b
    double      ; 2: c
}
GEP 索引如 ir 代码中的注释所示。现在访问 b 成员,c 代码:
Foo foo;
char **bptr = &foo.b;
先在堆栈上使用 alloca 指令分配对象,访问 b 成员,使用 GEP 指令计算指向内存位置的指针。
%foo = alloca %Foo
; char **bptr = &foo.b
%1 = getelementptr %Foo, %Foo* %foo, i32 0, i32 1
如果创建一个 Foo 对象数组,如下:
Foo bar[100];
bar[17].c = 0.0;
会转成以下 ir 代码:
; Foo bar[100]
%bar = alloca %Foo, i32 100
; bar[17].c = 0.0
%2 = getelementptr %Foo, %Foo* %bar, i32 17, i32 2
store double 0.0, double* %2
如上面代码所示,它首先会分配一个指向 100 个 Foo 对象的指针。然后用 GEP 指令检索数组中第17个条目的第二个元素。
类型转换
有九种不同类型的转换
- Bitwise casts (type casts)
- Zero-extending casts (unsigned upcasts).
- Sign-extending casts (signed upcasts).
- Truncasting casts (signed and unsigned downcasts).
- Floating-point extending casts (float upcasts).
- Floating-point truncasting casts (float downcasts)
- Pointer-to-integer casts.
- Integer-to-pointer casts.
- Address-space casts (pointer casts).
Bitwise Casts
bitwise cast 是按位强制转换。比如可以将指向字节的指针位转换为指向某个结构的指针。
typedef struct
{
    int a;
} Foo;

extern void *malloc(size_t size);
extern void free(void *value);

void allocate()
{
    Foo *foo = (Foo *) malloc(sizeof(Foo));
    foo.a = 12;
    free(foo);
}
转换成对应的 ir:
%Foo = type { i32 }

declare i8* @malloc(i32)
declare void @free(i8*)

define void @allocate() nounwind {
    %1 = call i8* @malloc(i32 4)
    %foo = bitcast i8* %1 to %Foo*
    %2 = getelementptr %Foo, %Foo* %foo, i32 0, i32 0
    store i32 12, i32* %2
    call void @free(i8* %1)
    ret void
}
Zero-Extending Casts(Unsigned Upcasts)
比如下面的 c 代码:
uint8 byte = 117;
uint32 word;

void main()
{
    /* The compiler automatically upcasts the byte to a word. */
    word = byte;
}
使用 zext 指令:
@byte = global i8 117
@word = global i32 0

define void @main() nounwind {
    %1 = load i8, i8* @byte
    %2 = zext i8 %1 to i32
    store i32 %2, i32* @word
    ret void
}
Sign-Extending Casts (Signed Upcasts)
将 zext 替换成 sext 指令即可。
@char = global i8 -17
@int  = global i32 0

define void @main() nounwind {
    %1 = load i8, i8* @char
    %2 = sext i8 %1 to i32
    store i32 %2, i32* @int
    ret void
}
Truncating Casts (Signed and Unsigned Downcasts)
signed 和 unsigned 整数都使用相同的指令 trunc 来减少相关数字的大小。这是因为 llvm ir 假设所有有符号整数值都是二进制补码格式,因此 turn 注意处理这两种情况:
@int = global i32 -1
@char = global i8 0

define void @main() nounwind {
    %1 = load i32, i32* @int
    %2 = trunc i32 %1 to i8
    store i8 %2, i8* @char
    ret void
}
Floating-Point Extending Casts (Float Upcasts)
浮点数可以使用 fpext 指令进行扩展,比如下面的 c 代码:
float small = 1.25;
double large;

void main()
{
    /* The compiler inserts an implicit float upcast. */
    large = small;
}
会变成:
@small = global float 1.25
@large = global double 0.0

define void @main() nounwind {
    %1 = load float, float* @small
    %2 = fpext float %1 to double
    store double %2, double* @large
    ret void
}
Floating-Point Truncating Casts (Float Downcasts)
浮点数可以截断为更小的大小:
@large = global double 1.25
@small = global float 0.0

define void @main() nounwind {
    %1 = load double, double* @large
    %2 = fptrunc double %1 to float
    store float %2, float* @small
    ret void
}
Pointer-to-Integer Casts
使用 ptrtoint 指令将指针类型转换为整数类型。
Integer-to-Pointer Casts
使用 inttoptr 指令将整数转换成指针。
函数和声明
函数定义取决于 calling convention、excption-aware 和模块是否对外公开。
下面是一个简单的 c 函数:
int Bar(void)
{
    return 17;
}
会转换成
define i32 @Bar() nounwind {
    ret i32 17
}
私有函数定义如下:
define private i32 @Foo() nounwind {
    ret i32 17
}
ir 的私有函数只是 llvm 模块级的私有函数,并不是和高级语言 private 关键字定义的函数对应。
函数原型在 ir 里使用 declare 来声明:
int Bar(int value);对应使用 declare 声明为:
declare i32 @Bar(i32 %value)可变参数的函数,要用省略号定义或声明它,然后需要使用特殊的函数调用语法。示例如下:
declare i32 @printf(i8*, ...) nounwind

@.textstr = internal constant [20 x i8] c"Argument count: %d\0A\00"

define i32 @main(i32 %argc, i8** %argv) nounwind {
    ; printf("Argument count: %d\n", argc)
    %1 = call i32 (i8*, ...) @printf(i8* getelementptr([20 x i8], [20 x i8]* @.textstr, i32 0, i32 0), i32 %argc)
    ret i32 0
}
函数重载不是在 ir 里处理的,是在源语言上处理的。重载的函数名称不同,示例如下:
int function(int a, int b) {
    return a + b;
}

double function(double a, double b, double x) {
    return a*b + x;
}
上面 c 代码对应 ir 是:
define i32 @_Z8functionii(i32 %a, i32 %b) #0 {
; [...]
  ret i32 %5
}

define double @_Z8functionddd(double %a, double %b, double %x) #0 {
; [...]
  ret double %8
}
可见在 ir 里,重载函数的名称和功能都是不同的。
类或结构体通常是按值传递,在传递对象时隐式克隆对象。比如下面的 c 代码:
struct Point {
    double x;
    double y;
    double z;
};

Point add_points(Point a, Point b) {
  Point p;
  p.x = a.x + b.x;
  p.y = a.y + b.y;
  p.z = a.z + b.z;
  return p;
}
对应 ir 是:
%struct.Point = type { double, double, double }

define void @add_points(%struct.Point* noalias sret %agg.result,
                        %struct.Point* byval align 8 %a,
                        %struct.Point* byval align 8 %b) #0 {
; there is no alloca here for Point p;
; p.x = a.x + b.x;
  %1 = getelementptr inbounds %struct.Point, %struct.Point* %a, i32 0, i32 0
  %2 = load double, double* %1, align 8
  %3 = getelementptr inbounds %struct.Point, %struct.Point* %b, i32 0, i32 0
  %4 = load double, double* %3, align 8
  %5 = fadd double %2, %4
  %6 = getelementptr inbounds %struct.Point, %struct.Point* %agg.result, i32 0, i32 0
  store double %5, double* %6, align 8
; p.y = a.y + b.y;
  %7 = getelementptr inbounds %struct.Point, %struct.Point* %a, i32 0, i32 1
  %8 = load double, double* %7, align 8
  %9 = getelementptr inbounds %struct.Point, %struct.Point* %b, i32 0, i32 1
  %10 = load double, double* %9, align 8
  %11 = fadd double %8, %10
  %12 = getelementptr inbounds %struct.Point, %struct.Point* %agg.result, i32 0, i32 1
  store double %11, double* %12, align 8
; p.z = a.z + b.z;
  %13 = getelementptr inbounds %struct.Point, %struct.Point* %a, i32 0, i32 2
  %14 = load double, double* %13, align 8
  %15 = getelementptr inbounds %struct.Point, %struct.Point* %b, i32 0, i32 2
  %16 = load double, double* %15, align 8
  %17 = fadd double %14, %16
  %18 = getelementptr inbounds %struct.Point, %struct.Point* %agg.result, i32 0, i32 2
  store double %17, double* %18, align 8
; there is no real returned value, because the previous stores directly wrote
; to the caller allocated value via %agg.result
  ret void
}
可以看到 add_points 函数返回的是 void,另外添加了一个参数,这个参数是指向返回结果的指针,有调用者来分配。这个指针是 noalias 属性,sret 属性表明这是返回值。参数是 byval 属性,表示他们是按值传递的结构。
下面代码是展示如何调用 add_points 函数。
int main() {
  Point a = {1.0, 3.0, 4.0};
  Point b = {2.0, 8.0, 5.0};
  Point c = add_points(a, b);
  return 0;
}
编成 ir 代码如下:
define i32 @main() #1 {
; these are the a, b, c in the scope of main
  %a = alloca %struct.Point, align 8
  %b = alloca %struct.Point, align 8
  %c = alloca %struct.Point, align 8
; these are copies, which are passed as arguments
  %1 = alloca %struct.Point, align 8
  %2 = alloca %struct.Point, align 8
; copy the global initializer main::a to %a
  %3 = bitcast %struct.Point* %a to i8*
  call void @llvm.memcpy.p0i8.p0i8.i64(i8* %3, i8* bitcast (%struct.Point* @main.a to i8*), i64 24, i32 8, i1 false)
; copy the global initializer main::b to %b
  %4 = bitcast %struct.Point* %b to i8*
  call void @llvm.memcpy.p0i8.p0i8.i64(i8* %4, i8* bitcast (%struct.Point* @main.b to i8*), i64 24, i32 8, i1 false)
; clone a to %1
  %5 = bitcast %struct.Point* %1 to i8*
  %6 = bitcast %struct.Point* %a to i8*
  call void @llvm.memcpy.p0i8.p0i8.i64(i8* %5, i8* %6, i64 24, i32 8, i1 false)
; clone b to %1
  %7 = bitcast %struct.Point* %2 to i8*
  %8 = bitcast %struct.Point* %b to i8*
  call void @llvm.memcpy.p0i8.p0i8.i64(i8* %7, i8* %8, i64 24, i32 8, i1 false)
; call add_points with the cloned values
  call void @add_points(%struct.Point* sret %c, %struct.Point* byval align 8 %1, %struct.Point* byval align 8 %2)
  ; [...]
}
可以看到调用者为返回值 %c 分配空间,并且确保在实际通过引用传递参数前克隆参数 a 和 b。
异常处理函数,可以返回一个指向异常实例的指针,创建一个 setjmp/longjmp 帧,或者简单指定 uwtable 属性。
函数指针的表达方式和 c 差不多,比如下面 c 代码:
int (*Function)(char *buffer);对应 ir 为:
@Function = global i32(i8*)* nullUnions
llvm 不支持 unions,下面的 c++ 代码:
union Foo
{
    int a;
    char *b;
    double c;
};

Foo Union;
对应 ir 为:
%union.Foo = type { double }
@Union = %union.Foo { 0.0 }
其它成员没有了,ir 要访问他们要用 bitcast 指令将指向 union 的指针转换为你想要的指针。
%1 = bitcast %union.Foo* @Union to i32*
store i32 1, i32* %1
%2 = bitcast %union.Foo* @Union to i8**
store i8* null, i8** %2
实际上 unions 只不过是一块使用不同隐式指针强制转换访问的内存。处理 unions 没有类型安全。前端语言需要对 unions 做支持,可以简单的分配 unions 的总大小,也就是最大成员的大小,然后根据需要生成代码来重新解释分配的内存。
if-then-else 分支
llvm ir 是按顺序执行的指令序列组成。这些指令组合在一起形成基本块,每个基本块都以改变程序控制流的指令结束。
下面是个简单的 if-then-else 分支:
int max(int a, int b) {
  if (a > b) {
    return a;
  } else {
    return b;
  }
}
在 ir 中,控制流是通过在基本块之间跳转实现的。这些基本块包含不改变控制流的指令序列。每个基本块都以改变程序控制流的指令结束。最常见的分支指令是 br。br 可以带上条件,然后它实现了一个简单的 if-then-else 。如下:
br i1 %cond, label %iftrue, label %iffalsebr 也可以实现无条件跳转到某个目的地:
br label %dest前面的 c 函数对应的 ir 代码如下:
define i32 @max(i32 %a, i32 %b) {
entry:
  %retval = alloca i32, align 4
  %0 = icmp sgt i32 %a, %b
  br i1 %0, label %btrue, label %bfalse

btrue:                                      ; preds = %2
  store i32 %a, i32* %retval, align 4
  br label %end

bfalse:                                     ; preds = %2
  store i32 %b, i32* %retval, align 4
  br label %end

end:                                     ; preds = %btrue, %bfalse
  %1 = load i32, i32* %retval, align 4
  ret i32 %1
}
如上代码所示,共有4个基本块,第一个是函数入口,使用 alloca 在堆栈上分配空间,用作较大的临时存储,然后使用 icmp 指令比较两个参数 %a 和 %b。结果是一个布尔标志 i1,将其用于 br 指令的条件。然后根据所采用的分支,将 %a 或 %b 存储到临时 %retval 变量中。每个分支都以无条件分支到最后一个基本块 %end 结束。来自 %retval 的值被加载并返回。
通过 opt -dot-cfg input.ll 可以获得 CFG 流程图。
select 指令可以进行更高级别优化,不生成分支,缩短代码,比如上面的 ir 代码优化后为:
define i32 @max(i32 %a, i32 %b) {
  %1 = icmp sgt i32 %a, %b
  %2 = select i1 %1, i32 %a, i32 %b
  ret i32 %2
}
静态单一赋值表(SSA Form)和 PHI
下面是一个 c 函数:
int max(int a, int b) {
  if (a > b) {
    return a;
  } else {
    return b;
  }
}
对应的 llvm ir 代码如下:
define i32 @max(i32 %a, i32 %b) {
entry:
  %retval = alloca i32, align 4
  %0 = icmp sgt i32 %a, %b
  br i1 %0, label %btrue, label %bfalse

btrue:                                      ; preds = %2
  store i32 %a, i32* %retval, align 4
  br label %end

bfalse:                                     ; preds = %2
  store i32 %b, i32* %retval, align 4
  br label %end

end:                                     ; preds = %btrue, %bfalse
  %1 = load i32, i32* %retval, align 4
  ret i32 %1
}
可以看到 max 函数使用 alloc 在堆栈上分配空间,其中存储了较大的值。在一个分支中,%a 被存储,而在另一个分支中,%b 被存储到堆栈分配的内存中。尽可能避免使用内存 load/store 操作,而是更多的使用寄存器。所以按下面方式来写:
define i32 @max(i32 %a, i32 %b) {
entry:
  %0 = icmp sgt i32 %a, %b
  br i1 %0, label %btrue, label %bfalse

btrue:
  %retval = %a
  br label %end

bfalse:
  %retval = %b
  br label %end

end:
  ret i32 %retval
}
这不是有效的 LLVM IR,因为 LLVM IR 是静态单已分配形式,也就是 SSA。SSA 形式要求每个变量只分配一次。SSA 形式支持并简化了大量的编译器优化,并且是命令式编程语言解释器中中间表示的实际上的标准。
那怎么用 SSA 形式 LLVM IR 实现上述代码?答案是神奇的 phi 指令。phi 指令以 SSA 理论中使用的 φ 函数命名。这个函数会根据控制流神奇的选择正确的值。在 LLVM 中,你必须手动指定值的名称和前一个基本块。
end:
  %retval = phi i32 [%a, %btrue], [%b, %bfalse]
这里我们指示 phi 指令在前一个基本块为 %btrue 时选择 %a。如果之前的基本块是 %bfalse,那么将使用 %b。然后将该值分配给一个新变量 %retval。
define i32 @max(i32 %a, i32 %b) {
entry:
  %0 = icmp sgt i32 %a, %b
  br i1 %0, label %btrue, label %bfalse

btrue:                                      ; preds = %2
  br label %end

bfalse:                                     ; preds = %2
  br label %end

end:                                     ; preds = %btrue, %bfalse
  %retval = phi i32 [%a, %btrue], [%b, %bfalse]
  ret i32 %retval
}
后端的 PHI
让我们看看 @max 函数现在如何映射到实际的机器代码。查看的是 x86 64 位生成的代码,用不同优化级别进行编译。非优化后端命令 llc -O0 -filetype=asm。得到的结果是:
max:                                    # @max
# %bb.0:                                # %entry
    cmpl    %esi, %edi                  # %edi = %a, %esi = %b
    jle     .LBB0_2
# %bb.1:                                # %btrue
    movl    %edi, -4(%rsp)              # mov src, dst
    jmp     .LBB0_3
.LBB0_2:                                # %bfalse
    movl    %esi, -4(%rsp)              # mov src, dst
    jmp     .LBB0_3
.LBB0_3:                                # %end
    movl    -4(%rsp), %eax              # return value in eax
    retq
参数 %a 和 %b 分别在 %edi 和 %esi 中传递。我们可以看到编译后端生成的代码使用堆栈来存储更大的值。因此,当我们编写 LLVM IR 时,编译器后端生成的代码并不是我们所想的。原因是编译器后端需要用真机指令来实现 phi 指令。通常这是通过分配给一个寄存器或存储到一个公共堆栈位置来完成的。通常编译器后端将使用堆栈来实现 phi 指令。但是,如果我们在后端使用更多优化,也就是 llc -O1,可以获得更优化的版本:
max:                                    # @max
# %bb.0:                                # %entry
    cmpl    %esi, %edi
    jg      .LBB0_2
# %bb.1:                                # %bfalse
    movl    %esi, %edi
.LBB0_2:                                # %end
    movl    %edi, %eax
    retq
这里的 phi 函数是通过使用 %edi 寄存器实现的。在一个分支中,%edi 已经包含所需的值,所以什么都没发生。在另一个分支中,%esi 被复制到 %edi。在 %end 基本块中,%edi 包含来自两个分支的所需值。这更像是我们的想法。我们可以看到优化是需要在整个编译管道中的应用的东西。
Lambda 函数
lambda 函数是一个匿名函数,它可以自由引用包含函数中的局部变量,也包括参数变量。Lambda 的实现和 Pascal 的嵌套函数一样,只是编译器负责为 lambda 函数生成内部名称。有几种不同的方法可以实现 lambda 函数。
int foo(int a)
{
  auto function = [a](int x) { return x + a; };
  return function(10);
}
这里的问题是 lambda 函数引用了调用者的一个局部变量,即 a,即使 lambda 函数是它自己的函数。这可以通过将局部变量作为隐式参数传递给 lambda 函数来轻松解决:
define internal i32 @lambda(i32 %a, i32 %x) {
  %1 = add i32 %a, %x
  ret i32 %1
}

define i32 @foo(i32 %a) {
  %1 = call i32 @lambda(i32 %a, i32 10)
  ret i32 %1
}
或者,如果 lambda 函数使用多个变量,你可以将他们包装在一个结构中,然后将指针传递给 lambda 函数:
extern int integer_parse();

int foo(int a, int b)
{
  int c = integer_parse();
  auto function = [a, b, c](int x) { return (a + b - c) * x; };
  return function(10);
}
对应 IR 是:
; ModuleID = 'lambda_func_1_cleaned.ll'
source_filename = "lambda_func_1_cleaned.ll"
target datalayout = "e-m:e-i64:64-f80:128-n8:16:32:64-S128"
target triple = "x86_64-unknown-linux-gnu"

%lambda_args = type { i32, i32, i32 }

declare i32 @integer_parse()

define i32 @lambda(%lambda_args* %args, i32 %x) {
  %1 = getelementptr %lambda_args, %lambda_args* %args, i32 0, i32 0
  %a = load i32, i32* %1
  %2 = getelementptr %lambda_args, %lambda_args* %args, i32 0, i32 1
  %b = load i32, i32* %2
  %3 = getelementptr %lambda_args, %lambda_args* %args, i32 0, i32 2
  %c = load i32, i32* %3
  %4 = add i32 %a, %b
  %5 = sub i32 %4, %c
  %6 = mul i32 %5, %x
  ret i32 %6
}

define i32 @foo(i32 %a, i32 %b) {
  %args = alloca %lambda_args
  %1 = getelementptr %lambda_args, %lambda_args* %args, i32 0, i32 0
  store i32 %a, i32* %1
  %2 = getelementptr %lambda_args, %lambda_args* %args, i32 0, i32 1
  store i32 %b, i32* %2
  %c = call i32 @integer_parse()
  %3 = getelementptr %lambda_args, %lambda_args* %args, i32 0, i32 2
  store i32 %c, i32* %3
  %4 = call i32 @lambda(%lambda_args* %args, i32 10)
  ret i32 %4
}
显然,这个主题有一些可能的变化:
- 你可以将所有隐式作为参数参数当成参数来传递。
- 你可以将结构中所有隐式参数作为显示参数传递。
- 你可以传入一个指向调用者帧的指针,并让 lambda 函数从输入帧中提取参数和局部变量。
生成器 Generators
生成器是一个函数,它以这样的一种方式重复生成一个值,使函数的状态在函数的重复调用中保持不变,包括函数在生产值时的局部偏移量。
实现生成器最直接的方法就是将其所有状态变量,包括参数、局部变量和返回值都包装到一个 ad-hoc 结构中,然后将该结构的地址传递给生成器。
某种程度上说,你需要在每次调用时跟踪你正在执行的生成器是哪个块。这可以通过多种方式完成。我们在这展示的方式是使用 LLVM 的 blockaddress 指令来保存下一个应该执行的本地代码块的地址。其它实现使用简单的状态变量,然后根据状态变量的值进行类似开关的调度。在这两种情况下,最终结果是相同的,也就是为生成器中的每个本地块执行不同的代码块。
重要的是将迭代器视为一种微线程,每当再次调用迭代器时,它就会恢复。换句话说,我们需要保存迭代器每次通过多远的地址,以便它可以恢复,就好像发生了微观线程切换一样。所以我们在返回指令之后保存指令的地址,这样我们就可以继续运行,就好像我们一开始就没有返回一样。
下面是一段简化的伪代码。
#include <stdio.h>

generator int foo()
{
    yield 1;
    yield 2;
    yield 3;
}

int main()
{
    foreach (int i in foo())
  printf("Value: %d\n", i);

    return 0;
}
对应的 IR 如下:
%foo_context = type {
    i8*,      ; 0: block (state)
    i32       ; 1: value (result)
}

define void @foo_setup(%foo_context* %context) nounwind {
    ; set up 'block'
    %1 = getelementptr %foo_context* %context, i32 0, i32 0
    store i8* blockaddress(@foo_yield, %.yield1), i8** %1

    ret void
}

; The boolean returned indicates if a result was available or not.
; Once no more results are available, the caller is expected to not call
; the iterator again.
define i1 @foo_yield(%foo_context* %context) nounwind {
    ; dispatch to the active generator block
    %1 = getelementptr %foo_context* %context, i32 0, i32 0
    %2 = load i8** %1
    indirectbr i8* %2, [ label %.yield1, label %.yield2, label %.yield3, label %.done ]

.yield1:
    ; store the result value (1)
    %3 = getelementptr %foo_context* %context, i32 0, i32 1
    store i32 1, i32* %3

    ; make 'block' point to next block to execute
    %4 = getelementptr %foo_context* %context, i32 0, i32 0
    store i8* blockaddress(@foo_yield, %.yield2), i8** %4

    ret i1 1

.yield2:
    ; store the result value (2)
    %5 = getelementptr %foo_context* %context, i32 0, i32 1
    store i32 2, i32* %5

    ; make 'block' point to next block to execute
    %6 = getelementptr %foo_context* %context, i32 0, i32 0
    store i8* blockaddress(@foo_yield, %.yield3), i8** %6

    ret i1 1

.yield3:
    ; store the result value (3)
    %7 = getelementptr %foo_context* %context, i32 0, i32 1
    store i32 3, i32* %7

    ; make 'block' point to next block to execute
    %8 = getelementptr %foo_context* %context, i32 0, i32 0
    store i8* blockaddress(@foo_yield, %.done), i8** %8

    ret i1 1

.done:
    ret i1 0
}

declare i32 @printf(i8*, ...) nounwind

@.string = internal constant [11 x i8] c"Value: %d\0A\00"

define void @main() nounwind {
    ; allocate and initialize generator context structure
    %context = alloca %foo_context
    call void @foo_setup(%foo_context* %context)
    br label %.head

.head:
    ; foreach (int i in foo())
    %1 = call i1 @foo_yield(%foo_context* %context)
    br i1 %1, label %.body, label %.tail

.body:
    %2 = getelementptr %foo_context* %context, i32 0, i32 1
    %3 = load i32* %2
    %4 = call i32 (i8*, ...)* @printf(i8* getelementptr([11 x i8]* @.string, i32 0, i32 0), i32 %3)
    br label %.head

.tail:
    ret void
}
下面是一个涉及局部变量的稍微复杂的示例:
#include <stdio.h>

generator int foo(int start, int after)
{
    for (int index = start; index < after; index++)
    {
        if (index % 2 == 0)
            yield index + 1;
        else
            yield index - 1;
    }
}

int main(void)
{
    foreach (int i in foo(0, 5))
        printf("Value: %d\n", i);

    return 0;
}
生成 IR 代码为:
%foo_context = type {
    i8*,      ; 0: block (state)
    i32,      ; 1: start (argument)
    i32,      ; 2: after (argument)
    i32,      ; 3: index (local)
    i32       ; 4: value (result)
}

define void @foo_setup(%foo_context* %context, i32 %start, i32 %after) nounwind {
    ; set up 'block'
    %1 = getelementptr %foo_context* %context, i32 0, i32 0
    store i8* blockaddress(@foo_yield, %.init), i8** %1

    ; set up 'start'
    %2 = getelementptr %foo_context* %context, i32 0, i32 1
    store i32 %start, i32* %2

    ; set up 'after'
    %3 = getelementptr %foo_context* %context, i32 0, i32 2
    store i32 %after, i32* %3

    ret void
}

define i1 @foo_yield(%foo_context* %context) nounwind {
    ; dispatch to the active generator block
    %1 = getelementptr %foo_context* %context, i32 0, i32 0
    %2 = load i8** %1
   indirectbr i8* %2, [ label %.init, label %.loop_close, label %.end ]

.init:
    ; copy argument 'start' to the local variable 'index'
    %3 = getelementptr %foo_context* %context, i32 0, i32 1
    %start = load i32* %3
    %4 = getelementptr %foo_context* %context, i32 0, i32 3
    store i32 %start, i32* %4
    br label %.head

.head:
    ; for (; index < after; )
    %5 = getelementptr %foo_context* %context, i32 0, i32 3
    %index = load i32* %5
    %6 = getelementptr %foo_context* %context, i32 0, i32 2
    %after = load i32* %6
    %again = icmp slt i32 %index, %after
    br i1 %again, label %.loop_begin, label %.exit

.loop_begin:
    %7 = srem i32 %index, 2
    %8 = icmp eq i32 %7, 0
    br i1 %8, label %.even, label %.odd

.even:
    ; store 'index + 1' in 'value'
    %9 = add i32 %index, 1
    %10 = getelementptr %foo_context* %context, i32 0, i32 4
    store i32 %9, i32* %10

    ; make 'block' point to the end of the loop (after the yield)
    %11 = getelementptr %foo_context* %context, i32 0, i32 0
    store i8* blockaddress(@foo_yield, %.loop_close), i8** %11

    ret i1 1

.odd:
    ; store 'index - 1' in value
    %12 = sub i32 %index, 1
    %13 = getelementptr %foo_context* %context, i32 0, i32 4
    store i32 %12, i32* %13

    ; make 'block' point to the end of the loop (after the yield)
    %14 = getelementptr %foo_context* %context, i32 0, i32 0
    store i8* blockaddress(@foo_yield, %.loop_close), i8** %14

    ret i1 1

.loop_close:
    ; increment 'index'
    %15 = getelementptr %foo_context* %context, i32 0, i32 3
    %16 = load i32* %15
    %17 = add i32 %16, 1
    store i32 %17, i32* %15
    br label %.head

.exit:
    ; make 'block' point to the %.end label
    %x = getelementptr %foo_context* %context, i32 0, i32 0
    store i8* blockaddress(@foo_yield, %.end), i8** %x
    br label %.end

.end:
    ret i1 0
}

declare i32 @printf(i8*, ...) nounwind

@.string = internal constant [11 x i8] c"Value: %d\0A\00"

define i32 @main() nounwind {
    ; allocate and initialize generator context structure
    %context = alloca %foo_context
    call void @foo_setup(%foo_context* %context, i32 0, i32 5)
    br label %.head

.head:
    ; foreach (int i in foo(0, 5))
    %1 = call i1 @foo_yield(%foo_context* %context)
    br i1 %1, label %.body, label %.tail

.body:
    %2 = getelementptr %foo_context* %context, i32 0, i32 4
    %3 = load i32* %2
    %4 = call i32 (i8*, ...)* @printf(i8* getelementptr([11 x i8]* @.string, i32 0, i32 0), i32 %3)
    br label %.head

.tail:
    ret i32 0
}
执行上述操作的另一种可能方法是为每个状态生成一个 LLVM IR 函数,然后存储一个函数指针。
在上下文结构中,每当需要调用新的状态或函数时都会更新。
面向对象结构
接下来研究各种面向对象的结构,看怎么映射到 LLVM IR。
类
一个类只不过是一个结构,它具有一组相关函数,这些函数接受一个隐式的第一个参数,即指向该结构的指针。因此将一个类映射到 LLVM IR 很简单:
#include <stddef.h>

class Foo
{
public:
    Foo()
    {
  _length = 0;
    }

    size_t GetLength() const
    {
  return _length;
    }

    void SetLength(size_t value)
    {
  _length = value;
    }

private:
    size_t _length;
};
首先将这段代码转换成两个独立的部分:
- 结构定义
- 方法列表,包括构造函数
; The structure definition for class Foo.
%Foo = type { i32 }

; The default constructor for class Foo.
define void @Foo_Create_Default(%Foo* %this) nounwind {
    %1 = getelementptr %Foo, %Foo* %this, i32 0, i32 0
    store i32 0, i32* %1
    ret void
}

; The Foo::GetLength() method.
define i32 @Foo_GetLength(%Foo* %this) nounwind {
    %1 = getelementptr %Foo, %Foo* %this, i32 0, i32 0
    %2 = load i32, i32* %1
    ret i32 %2
}

; The Foo::SetLength() method.
define void @Foo_SetLength(%Foo* %this, i32 %value) nounwind {
    %1 = getelementptr %Foo, %Foo* %this, i32 0, i32 0
    store i32 %value, i32* %1
    ret void
}
然后我们确保调用了构造函数 Foo_Create_Default。
每当创建结构的实例时:
Foo foo;%foo = alloca %Foo
call void @Foo_Create_Default(%Foo* %foo)虚拟方法
虚方法只不过是编译器控制的函数指针。每个虚方法都记录在 vtable 中,它是给定类所需的所有函数指针的结构:
class Foo {
public:
virtal int GetLengthTimesTwo() const {
return _length * 2;
}
void SetLength(size_t value) {
_length = value;
}
private:
int _length;
};
int main() {
Foo foo;
foo.setLength(4);
return foo.GetLengthTimesTwo();
}这变成:
%Foo_vtable_type = type { i32(%Foo*)* }
%Foo = type { %Foo_vtable_type*, i32 }
define i32 @Foo_GetLengthTimesTwo(%Foo* %this) nounwind {
%1 = getelementptr %Foo, %Foo* %this, i32 0, i32 1
%2 = load i32, i32* %1
%3 = mul i32 %2, 2
ret i32 %3
}
@Foo_vtable_data = global %Foo_vtable_type {
i32(%Foo*)* @Foo_GetLengthTimesTwo
}
define void @Foo_Create_Default(%Foo* %this) nounwind {
%1 = getelementptr %Foo, %Foo* %this, i32 0, i32 0
store %Foo_vtable_type* @Foo_vtable_data, %Foo_vtable_type** %1
%2 = getelementptr %Foo, %Foo* %this, i32 0, i32 1
store i32 0, i32* %2
ret void
}
define void @Foo_SetLength(%Foo* %this, i32 %value) nounwind {
%1 = getelementptr %Foo, %Foo* %this, i32 0, i32 1
store i32 %value, i32* %1
ret void
}
define i32 @main(i32 %argc, i8** %argv) nounwind {
%foo = alloca %Foo
call void @Foo_Create_Default(%Foo* %foo)
call void @Foo_SetLength(%Foo* %foo, i32 4)
%1 = getelementptr %Foo, %Foo* %foo, i32 0, i32 0
%2 = load %Foo_vtable_type*, %Foo_vtable_type** %1
%3 = getelementptr %Foo_vtable_type, %Foo_vtable_type* %2, i32 0, i32 0
%4 = load i32(%Foo*)*, i32(%Foo*)** %3
%5 = call i32 %4(%Foo* %foo)
ret i32 %5
}请注意,一些 C++ 编译器将 _vtable 存储在结构中的负偏移量处,这样 memeset(this, 0, sizeof(*this))之类的东西就可以工作,即使在 OOP 上下文中应始终避免使用此类命令。
Rust 特征和 VTable
与 C++ 相比,Rust 确实具有完全不同的对象模型。但是,当涉及到动态调度的低级细节时,他们非常相似。我们将探讨 rust 文档中的一个示例,以及 rustc 编译器发出什么样的 llvm IR。rust 和 C++ 都使用虚拟方法进行动态调度。但是,在 rust 中,高级语言中没有虚拟方法之类的东西。相反,我们可以为我们的数据类型实现 trait,然后实现一个接口,该接口接受所有实现 trait 的数据类型并动态分派到正确的 trait 实现,也就是下面示例中 dyn Trait 语法。
编译器必须在运行时动态决定使用哪个函数。编译器只知道存储在 components 向量中的对象确实满足特征 Draw。作为对不太熟悉 rust 的人的附注:将对象包装在 Box 中本质上是将对象放在堆上,有点类似于 C++ 中的 unique_ptr 并有效地允许我们放置 trait 对象,也就是本例中为 dyn Drawable 在向量中。
; test::Screen::run
; Function Attrs: nonlazybind uwtable
define void @"Screen::run"(%Screen* %self) {
start:

;; (omitting the initial prologue and setup code)
;; this is the start of the for loop in Screen::run calling the next method
;; on the iterator for the first time and checking whether it is None (or
;; null in llvm here)
;; %5 contains the pointer to the first component in the vector here
  %6 = icmp eq i64* %5, null
  br i1 %6, label %end, label %forloop

end:                                              ; preds = %forloop, %start
  ret void

forloop:                                          ; preds = %start, %forloop
  %7 = phi i64* [ %next_component, %forloop ], [ %5, %start ]
;; here the boxed pointer is retrieved and dereferenced to retrieve the
;; vtable pointer
  %8 = bitcast i64* %7 to {}**
  %self_ptr = load {}*, {}** %8
  %9 = getelementptr inbounds i64, i64* %7, i64 1
  %vtable_ptr = bitcast i64* %9 to void ({}*)***
  %vtable = load void ({}*)**, void ({}*)*** %vtable_ptr
;; 3 is the index into the vtable struct, which refers to the draw implementation for this particular struct
  %trait_method_ptr = getelementptr inbounds void ({}*)*, void ({}*)** %vtable, i64 3
  %trait_method = load void ({}*)*, void ({}*)** %vmethod
;; indirect call to trait method
  call void %trait_method({}* %self_ptr)

;; retrieve the next object
  %next_component = call i64* @"<core::slice::iter::Iter<T> as core::iter::traits::iterator::Iterator>::next"({ i64*, i64* }* %iter)
  %14 = icmp eq i64* %next_component, null
  br i1 %14, label %end, label %forloop
}
在 llvm 模块的全局变量中,我们可以看到如下所示的 vtable。Button 和 SelectBox 都有关联的 vtable。
@vtable.screen = private unnamed_addr constant
  ;; the Type of the constant vtable structure
  { void (%SelectBox*)*, i64, i64, void (%SelectBox*)* }
  {
    ;; first entry is the function to drop the object
    void (%SelectBox*)* @"core::ptr::drop_in_place<test::SelectBox>",  ;; destructor
    i64 32, ;; size
    i64 8,  ;; alignment
    ;; last in the vtable is the pointer to the SelectBox::draw implementation
    void (%SelectBox*)* @"<test::SelectBox as test::Draw>::draw"
  }

;; the vtable for Button is structured basically the same
@vtable.button = private unnamed_addr constant
    { void (%Button*)*, i64, i64, void (%Button*)* }
    {
  void (%Button*)* @"core::ptr::drop_in_place<test::Button>",
  i64 32, i64 8,
  void (%Button*)* @"<test::Button as test::Draw>::draw"
    }
这篇博文 Exploring Dynamic Dispatch in Rust 更详细的解释 vtable 和动态调度以及他们在 rust 和 C++ 中的区别。
单一继承
单继承非常简单:每个结构体或类在内存中按声明顺序依次排列。
class Base {
  public:
    void SetA(int value) {
_a = value;
    }
  private:
    int _a;
};

class Derived: public Base {
  public:
    void SetB(int value) {
SetA(value);
_b = value;
    }
  protected:
    int _b;
}
在这里 a 和 b 将在内存中彼此跟随,因此从一个类继承只是一个简单的问题。
将基类声明为继承类中的第一个成员。
%Base = type {
    i32         ; '_a' in class Base
}

define void @Base_SetA(%Base* %this, i32 %value) nounwind {
    %1 = getelementptr %Base, %Base* %this, i32 0, i32 0
    store i32 %value, i32* %1
    ret void
}

%Derived = type {
    i32,        ; '_a' from class Base
    i32         ; '_b' from class Derived
}

define void @Derived_SetB(%Derived* %this, i32 %value) nounwind {
    %1 = bitcast %Derived* %this to %Base*
    call void @Base_SetA(%Base* %1, i32 %value)
    %2 = getelementptr %Derived, %Derived* %this, i32 0, i32 1
    store i32 %value, i32* %2
    ret void
}
因此,基类简单的成为派生类的类型声明的普通成员。
然后编译器必须在派生类被引用为其基类时插入适当的类型转换,如上所示,使用 bitcast 运算符。
多重继承
多重继承也不是很难,只是在每个派生类内部按顺序排列多个继承的结构,同时考虑到多次继承的数据成员的重复性。
下面的 c++ 代码:
class BaseA
{
public:
    void SetA(int value)
    {
  _a = value;
    }

private:
    int _a;
};

class BaseB: public BaseA
{
public:
    void SetB(int value)
    {
  SetA(value);
  _b = value;
    }

private:
    int _b;
};

class Derived:
    public BaseA,
    public BaseB
{
public:
    void SetC(int value)
    {
  SetB(value);
  _c = value;
    }

private:
    // Derived now has two '_a' members and one '_b' member.
    int _c;
};
等效 LLVM IR:
%BaseA = type {
    i32         ; '_a' from BaseA
}

define void @BaseA_SetA(%BaseA* %this, i32 %value) nounwind {
    %1 = getelementptr %BaseA, %BaseA* %this, i32 0, i32 0
    store i32 %value, i32* %1
    ret void
}

%BaseB = type {
    i32,        ; '_a' from BaseA
    i32         ; '_b' from BaseB
}

define void @BaseB_SetB(%BaseB* %this, i32 %value) nounwind {
    %1 = bitcast %BaseB* %this to %BaseA*
    call void @BaseA_SetA(%BaseA* %1, i32 %value)
    %2 = getelementptr %BaseB, %BaseB* %this, i32 0, i32 1
    store i32 %value, i32* %2
    ret void
}

%Derived = type {
    i32,        ; '_a' from BaseA
    i32,        ; '_a' from BaseB
    i32,        ; '_b' from BaseB
    i32         ; '_c' from Derived
}

define void @Derived_SetC(%Derived* %this, i32 %value) nounwind {
    %1 = bitcast %Derived* %this to %BaseB*
    call void @BaseB_SetB(%BaseB* %1, i32 %value)
    %2 = getelementptr %Derived, %Derived* %this, i32 0, i32 2
    store i32 %value, i32* %2
    ret void
}
然后,只要将 baseB 作为 BaseB 的实例引用,编译器就会提供所需的类型转换和指针算术。请注意,他所需要的只是从一个类到另一个类的位转换以及及时 getelementptr 的最后一个参数的调整。
虚拟继承
虚拟继承实际上非常简单,因为它要求将相同的基类合并到一个实例中。比如下面的 c++ 代码:
class BaseA
{
public:
    int a;
};

class BaseB: public BaseA
{
public:
    int b;
};

class BaseC: public BaseA
{
public:
    int c;
};

class Derived:
    public virtual BaseB,
    public virtual BaseC
{
    int d;
};
Dervied 将只包含一个 BaseA 实例,即使它的继承图规定它应该有两个继承。
结果如下:
class Derived
{
public:
    int a;
    int b;
    int c;
    int d;
};
所以 a 的第二个实例被默认的忽略,因为它会导致 BaseA 的多个实例存在于 Derived 中。
接口 Interface
接口只不过是没有数据成员的基类,其中所有方法都是纯虚拟的,也就是没有主体。因此转化 IR 的方式和将虚拟成员函数转换为 LLVM IR 的方式是一样的。
Boxing 和 Unboxing
Boxing 是将非对象原始值转换成对象的过程。创建一个包装类,你可以用非对象值实例化和初始化它。
Unboxing 是 boxing 的逆过程。你通过从 box 对象中检索 box 的值,将一个完整的对象降级为一个纯标量值。
下面是 Boxing 和 Unboxing 对应的 IR 代码:
@Boxee = global i32 17

%Integer = type { i32 }

define void @Integer_Create(%Integer* %this, i32 %value) nounwind {
    ; you might set up a vtable and associated virtual methods here
    %1 = getelementptr %Integer, %Integer* %this, i32 0, i32 0
    store i32 %value, i32* %1
    ret void
}

define i32 @Integer_GetValue(%Integer* %this) nounwind {
    %1 = getelementptr %Integer, %Integer* %this, i32 0, i32 0
    %2 = load i32, i32* %1
    ret i32 %2
}

define i32 @main() nounwind {
    ; box @Boxee in an instance of %Integer
    %1 = load i32, i32* @Boxee
    %2 = alloca %Integer
    call void @Integer_Create(%Integer* %2, i32 %1)

    ; unbox @Boxee from an instance of %Integer
    %3 = call i32 @Integer_GetValue(%Integer* %2)

    ret i32 0
}
New 运算符
new 运算符通常只不过是 C malloc 函数的类型安全版本,在 C++ 的某些实现中,它们可以互换调用,而不会导致看不见或不需要的副作用。
实例的 new 操作符
new X 对应的 llvm ir 代码如下:
declare i8* @malloc(i32) nounwind

%X = type { i8 }

define void @X_Create_Default(%X* %this) nounwind {
    %1 = getelementptr %X, %X* %this, i32 0, i32 0
    store i8 0, i8* %1
    ret void
}

define void @main() nounwind {
    %1 = call i8* @malloc(i32 1)
    %2 = bitcast i8* %1 to %X*
    call void @X_Create_Default(%X* %2)
    ret void
}
new X(Y,Z) 形式的调用是相同的,除了 X 和 Z 作为参数传递给构造函数。
数组的 new 运算符
代码 new X[100] 被映射到一个循环中,一次初始化每个数组元素:
declare i8* @malloc(i32) nounwind

%X = type { i32 }

define void @X_Create_Default(%X* %this) nounwind {
    %1 = getelementptr %X, %X* %this, i32 0, i32 0
    store i32 0, i32* %1
    ret void
}

define void @main() nounwind {
    %n = alloca i32                  ; %n = ptr to the number of elements in the array
    store i32 100, i32* %n

    %i = alloca i32                  ; %i = ptr to the loop index into the array
    store i32 0, i32* %i

    %1 = load i32, i32* %n           ; %1 = *%n
    %2 = mul i32 %1, 4               ; %2 = %1 * sizeof(X)
    %3 = call i8* @malloc(i32 %2)    ; %3 = malloc(100 * sizeof(X))
    %4 = bitcast i8* %3 to %X*       ; %4 = (X*) %3
    br label %.loop_head

.loop_head:                         ; for (; %i < %n; %i++)
    %5 = load i32, i32* %i
    %6 = load i32, i32* %n
    %7 = icmp slt i32 %5, %6
    br i1 %7, label %.loop_body, label %.loop_tail

.loop_body:
    %8 = getelementptr %X, %X* %4, i32 %5
    call void @X_Create_Default(%X* %8)

    %9 = add i32 %5, 1
    store i32 %9, i32* %i

    br label %.loop_head

.loop_tail:
    ret void
}
C 调用 LLVM 接口
项目在:CLLVMCase
这是代码:
/*
int sum(int a, int b) {
    return a + b;
}
,*/
void csum() {
    LLVMModuleRef module = LLVMModuleCreateWithName("sum_module");
    LLVMTypeRef param_types[] = {LLVMInt32Type(), LLVMInt32Type()};

    // 函数参数依次是函数的类型,参数类型向量,函数数,表示函数是否可变的布尔值。
    LLVMTypeRef ftype = LLVMFunctionType(LLVMInt32Type(), param_types, 2, 0);
    LLVMValueRef sum = LLVMAddFunction(module, "sum", ftype);

    LLVMBasicBlockRef entry = LLVMAppendBasicBlock(sum, "entry");

    LLVMBuilderRef builder = LLVMCreateBuilder();
    LLVMPositionBuilderAtEnd(builder, entry);

    // IR 的表现形式有三种,一种是内存中的对象集,一种是文本语言,比如汇编,一种是二进制编码字节 bitcode。

    LLVMValueRef tmp = LLVMBuildAdd(builder, LLVMGetParam(sum, 0), LLVMGetParam(sum, 1), "tmp");
    LLVMBuildRet(builder, tmp);

    char *error = NULL;
    LLVMVerifyModule(module, LLVMAbortProcessAction, &error);
    LLVMDisposeMessage(error);

    // 可执行引擎,如果支持 JIT 就用它,否则用 Interpreter。
    LLVMExecutionEngineRef engine;
    error = NULL;
    LLVMLinkInMCJIT();
    LLVMInitializeNativeTarget();
    if (LLVMCreateExecutionEngineForModule(&engine, module, &error) != 0) {
  fprintf(stderr, "Could not create execution engine: %s\n", error);
  return;
    }
    if (error)
    {
  LLVMDisposeMessage(error);
  return;
    }

    long long x = 5;
    long long y = 6;

    // LLVM 提供了工厂函数来创建值,这些值可以被传递给函数。
    LLVMGenericValueRef args[] = {LLVMCreateGenericValueOfInt(LLVMInt32Type(), x, 0), LLVMCreateGenericValueOfInt(LLVMInt32Type(), y, 0)};

    LLVMInitializeNativeAsmPrinter();
    LLVMInitializeNativeAsmParser();

    // 函数调用
    LLVMGenericValueRef result = LLVMRunFunction(engine, sum, 2, args);
    printf("%lld\n", LLVMGenericValueToInt(result, 0));

    // 生成 bitcode 文件
    if (LLVMWriteBitcodeToFile(module, "sum.bc") != 0) {
  fprintf(stderr, "Could not write bitcode to file\n");
  return;
    }

    LLVMDisposeBuilder(builder);
    LLVMDisposeExecutionEngine(engine);
}
Swift 调用 LLVM 接口
llvm 的接口还可以通过 swift 来调用。
先创建一个 module.modulemap 文件,创建 LLVMC.h 和 LLVMC.c 文件,自动生成 SwiftLLVMCase-Bridging-Header.h。设置 header search paths 为 llvm 所在路径 /usr/local/opt/llvm/include ,library search paths 设置为 /usr/local/opt/llvm/lib 。将 /usr/local/opt/llvm/lib/libLLVM.dylib 加到 Linked Frameworks and Libraries 里。
module.modulemap 内容
module llvm [extern_c] {
    header "LLVMC.h"
    export *
}
LLVMC.h 里设置要用到的 llvm 的头文件,比如:
#ifndef LLVMC_h
#define LLVMC_h

#include <stdio.h>
#include <llvm-c/Analysis.h>
#include <llvm-c/BitReader.h>
#include <llvm-c/BitWriter.h>
#include <llvm-c/Core.h>
#include <llvm-c/Disassembler.h>
#include <llvm-c/ExecutionEngine.h>
#include <llvm-c/IRReader.h>
#include <llvm-c/Initialization.h>
#include <llvm-c/Linker.h>
#include <llvm-c/Object.h>
#include <llvm-c/Support.h>
#include <llvm-c/Target.h>
#include <llvm-c/TargetMachine.h>
#include <llvm-c/Transforms/IPO.h>
#include <llvm-c/Transforms/PassManagerBuilder.h>
#include <llvm-c/Transforms/Scalar.h>
#include <llvm-c/Transforms/Vectorize.h>
#include <llvm-c/lto.h>

#endif /* LLVMC_h */
在 swift 中写如下代码试试
import Foundation
import llvm

func hiIR() {
    let module = LLVMModuleCreateWithName("HiModule")
    LLVMDumpModule(module)
    LLVMDisposeModule(module)
}

hiIR()
执行结果如下:
; ModuleID = 'HiModule'
source_filename = "HiModule"
下面一个简单的 c 函数
int sum(int a, int b) {
  return a + b;
}
使用 llvm 的接口写对应的 IR 代码如下:
func cSum() {
    let m = Module(name: "CSum")
    let bd = IRBuilder(module: m)
    let f1 = bd.addFunction("sum", type: FunctionType([IntType.int32, IntType.int32], IntType.int32))

    // 添加基本块
    let entryBB = f1.appendBasicBlock(named: "entry")
    bd.positionAtEnd(of: entryBB)

    let a = f1.parameters[0]
    let b = f1.parameters[1]

    let tmp = bd.buildAdd(a, b)
    bd.buildRet(tmp)

    m.dump()

}
dump 出对应 IR 如下:
; ModuleID = 'CSum'
source_filename = "CSum"

define i32 @sum(i32 %0, i32 %1) {
entry:
%2 = add i32 %0, %1
ret i32 %2
}
对于控制流函数,比如下面的 swift 函数:
func giveMeNumber(_ isBig : Bool) -> Int {
    let re : Int
    if !isBig {
  // the fibonacci series (sort of)
  re = 3
    } else {
  // the fibonacci series (sort of) backwards
  re = 4
    }
    return re
}
使用 llvm 接口编写 IR,代码如下:
func controlFlow() {
    let m = Module(name: "CF")
    let bd = IRBuilder(module: m)
    let f1 = bd.addFunction("calculateFibs", type: FunctionType([IntType.int1], FloatType.double))
    let entryBB = f1.appendBasicBlock(named: "entry")
    bd.positionAtEnd(of: entryBB)

    // 给本地变量分配空间 let retVal : Double
    let local = bd.buildAlloca(type: FloatType.double, name: "local")

    // 条件比较 if !backward
    let test = bd.buildICmp(f1.parameters[0], IntType.int1.zero(), .equal)

    // 创建 block
    let thenBB = f1.appendBasicBlock(named: "then")
    let elseBB = f1.appendBasicBlock(named: "else")
    let mergeBB = f1.appendBasicBlock(named: "merge")

    bd.buildCondBr(condition: test, then: thenBB, else: elseBB)

    // 指到 then block
    bd.positionAtEnd(of: thenBB)
    let thenVal = FloatType.double.constant(1/89)
    bd.buildBr(mergeBB) // 到 merge block

    // 指到 else block
    bd.positionAtEnd(of: elseBB)
    let elseVal = FloatType.double.constant(1/109)
    bd.buildBr(mergeBB) // 到 merge block

    // 指到 merge block
    bd.positionAtEnd(of: mergeBB)
    let phi = bd.buildPhi(FloatType.double, name: "phi_example")
    phi.addIncoming([
  (thenVal, thenBB),
  (elseVal, elseBB)
    ])
    // 赋值给本地变量
    bd.buildStore(phi, to: local)
    let ret = bd.buildLoad(local, type: FloatType.double, name: "ret")
    bd.buildRet(ret)

    m.dump()
}
输出对应 IR 代码:
; ModuleID = 'CF'
source_filename = "CF"

define double @giveMeNumber(i1 %0) {
entry:
  %local = alloca i32, align 4
  %1 = icmp eq i1 %0, false
  br i1 %1, label %then, label %else

then:                                             ; preds = %entry
  br label %merge

else:                                             ; preds = %entry
  br label %merge

merge:                                            ; preds = %else, %then
  %phi_example = phi i32 [ 3, %then ], [ 4, %else ]
  store i32 %phi_example, i32* %local, align 4
  %ret = load i32, i32* %local, align 4
  ret i32 %ret
}
这里有完整代码 SwiftLLVMCase。
动态执行代码
DYLD_INSERT_LIBRARIES
DYLD_INSERT_LIBRARIES 是一个环境变量,可以插入你的代码到没有源码的程序进程中。比如下面的代码:
DYLD_INSERT_LIBRARIES=@path/Frameworks/Interposing.framework/Interpos这样就可以在 +load 方法中添加自己的代码。SwiftUI Preview 也是使用的这种方法。如下:
DYLD_INSERT_LIBRARIES=/Applications/Xcode.app/Contents/Developer/Platforms/iPhoneOS.platform/Library/Developer/CoreSimulator/Profiles/Runtimes/iOS.simruntime/Contents/Resources/RuntimeRoot//System/Library/PrivateFrameworks/PreviewsInjection.framework/PreviewsInjectiondyld 有机会修改一个二进制地址用来指向你定义的函数地址。在 Mach-O 里新增一个用来记录替换函数和函数地址的 (__DATA,__interpose)。对应宏定义:
#define DYLD_INTERPOSE(_replacement,_replacee) \
   __attribute__((used)) static struct{ const void* replacement; const void* replacee; } _interpose_##_replacee \
            __attribute__ ((section ("__DATA,__interpose"))) = { (const void*)(unsigned long)&_replacement, (const void*)(unsigned long)&_replacee };

#endif
dyld 还包含了一个 dyld_dynamic_interpose 函数用以在运行时插入函数。
解释执行 bitcode(IR)
IR 的表现形式有三种,一种是内存中的对象集,一种是文本语言,一种是二进制编码字节 bitcode。
对于 Intel 芯片可以通过 Pin,arm 架构可以用 DynamoRIO,目前 DynamoRIO 只支持 Window、Linux 和 Android 系统,对 macOS 的支持还在进行中。另一种方式是通过基于 llvm 的 interpreter 开发来实现解释执行 bitcode,llvm 用很多 C++ 的接口在内存中操作,将可读的文本文件解析到内存中,编译过程文本的 IR 不会生成,只会生成一种紧凑的二进制表示,也就是 bitcode。下面具体说下怎么做。
先构建一个支持 libffi 的 llvm。编译 llvm 源码时加上 libffi 的选项来打开 DLLVM_ENABLE_FFI 的选项打开 libffi,编译命令如下:
cmake -G Ninja -DLLVM_ENABLE_FFI:BOOL=ON ../llvm创建一个项目。cmake 文件里注意设置自己的编译生成的 llvm 路径,还有 llvm 源码路径,设置这个路径主要是为了用安装 llvm 时没有包含的 ExecutionEngine/Interpreter/Interpreter.h 头文件。
实现方式是通过访问 llvm 的 ExcutionEngine 进行 IR 指令解释执行。声明一个可访问 ExcutionEngine 内部的类 PInterpreter,代码如下:
// 使用 public 访问内部
class PInterpreter : public llvm::ExecutionEngine,
         public llvm::InstVisitor<llvm::Interpreter> {
    public:
    llvm::GenericValue ExitValue;
    llvm::DataLayout TD;
    llvm::IntrinsicLowering *IL;
    std::vector<llvm::ExecutionContext> ECStack;
    std::vector<llvm::Function*> AtExitHandlers;
};
然后声明要用的方法。
class MInterpreter : public llvm::ExecutionEngine {
    public:
    llvm::Interpreter *interp;
    PInterpreter *pItp;
    llvm::Module *module;

    explicit MInterpreter(llvm::Module *M);
    virtual ~MInterpreter();

    virtual void run();
    virtual void execute(llvm::Instruction &I);

    // 入口
    virtual int runMain(std::vector<std::string> args,
      char * const *envp = 0);

    // 遵循 ExecutionEngine 接口
    llvm::GenericValue runFunction(
  llvm::Function *F,
  const std::vector<llvm::GenericValue> &ArgValues
    );
    void *getPointerToNamedFunction(const std::string &Name,
            bool AbortOnFailure = true);
    void *recompileAndRelinkFunction(llvm::Function *F);
    void freeMachineCodeForFunction(llvm::Function *F);
    void *getPointerToFunction(llvm::Function *F);
    void *getPointerToBasicBlock(llvm::BasicBlock *BB);
};
如上面代码所示,因为要执行 IR,所以用到获取 IR 的函数和基本块地址的方法,getPointerToFunction 和 getPointerToBasicBlock。最后再执行指令时,先打印出指令,然后进行执行,代码如下:
class MingInterpreter : public MInterpreter {
    public:
    MingInterpreter(Module *M) : MInterpreter(M) {};
    virtual void execute(Instruction &I) {
  I.print(errs());
  MInterpreter::execute(I);
    }
};
完整代码参看 MingInterpreter。
项目是基于 c 语言,可以使用 llvm include 里的 llvm-c/ExecutionEngine.h 接口头文件,使用 c 来编写。OC 和 Swift 项目还需要根据各自语言特性进行开发完善解释功能。